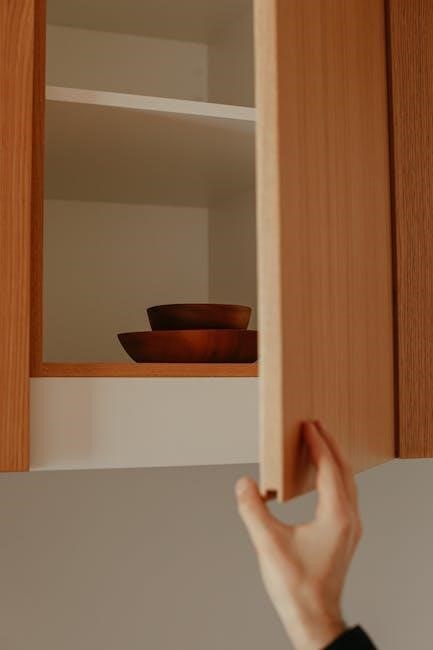
briggs and stratton vanguard service manual pdf

The Briggs and Stratton Vanguard Service Manual is an essential resource for maintaining and repairing Vanguard engines, offering detailed guidance on troubleshooting, maintenance, and technical specifications.

Overview of the Vanguard Engine Series

The Vanguard engine series, produced by Briggs and Stratton, is renowned for its durability and versatility, powering various equipment like lawn mowers, generators, and commercial machinery. Designed for heavy-duty applications, these engines feature advanced OHV technology, V-Twin designs, and robust construction. The series includes both gasoline and diesel options, catering to diverse needs. Known for reliability, Vanguard engines are a popular choice for both commercial and residential use;

Importance of the Service Manual for Maintenance and Repair

The service manual is crucial for proper maintenance and repair of Vanguard engines, providing detailed instructions, diagrams, and troubleshooting tips. It ensures safety, optimal performance, and extends engine lifespan by guiding users through routine tasks and complex repairs, making it indispensable for technicians and homeowners alike.

How to Find the Briggs and Stratton Vanguard Service Manual PDF

The Vanguard service manual PDF can be found on Briggs and Stratton’s official website or through authorized dealers by entering your engine’s model number for precise access.

Official Sources for Downloading the Manual

The best source for downloading the Briggs and Stratton Vanguard service manual is the official Briggs and Stratton website. By entering your engine’s specific model number, you can access the correct PDF manual tailored to your engine’s needs. Additionally, authorized Briggs and Stratton dealers often provide access to these manuals upon request, ensuring authenticity and reliability.

Third-Party Websites and Forums for Manual Access

Several third-party websites and forums offer the Briggs and Stratton Vanguard service manual PDF for download. Online communities like forums and specialized repair sites often share these resources. While convenient, ensure the source is reliable to avoid outdated or incorrect information. Additionally, some websites may require registration or membership to access the manual or related repair guides and parts lists.

Key Sections of the Briggs and Stratton Vanguard Service Manual

The manual includes engine specifications, adjustment procedures, and troubleshooting guides, providing detailed information and practical steps for optimal Vanguard engine performance and maintenance.

Engine Specifications and Technical Details

The Vanguard service manual provides detailed engine specifications, including model numbers, horsepower, torque, and displacement. It outlines cylinder arrangement, valve types, and fuel systems, ensuring users understand their engine’s capabilities and requirements for optimal performance and maintenance. This section is crucial for diagnosing issues and verifying compatibility with replacement parts, offering a comprehensive technical overview tailored to Vanguard engines.

Adjustment and Calibration Procedures

The manual offers detailed adjustment and calibration procedures, ensuring optimal engine performance. It covers carburetor tuning, governor settings, and valve clearance adjustments. Step-by-step instructions guide users through critical adjustments, emphasizing safety and precision. This section is vital for maintaining engine efficiency and preventing potential issues, helping users adhere to manufacturer guidelines for reliable operation.

Troubleshooting Common Issues

The manual provides comprehensive troubleshooting guides for common Vanguard engine issues, such as engine surging, poor fuel economy, or ignition problems. Detailed diagnostic charts and error code interpretations help identify root causes. Step-by-step repair procedures and maintenance tips ensure quick resolution, minimizing downtime and optimizing performance. This section is indispensable for resolving operational issues effectively.

Maintenance and Servicing Guidelines

Regular maintenance activities, such as oil changes and filter cleaning, are crucial for optimal performance. Follow the manual’s preventive care schedules to prevent issues and extend engine life.

Routine Maintenance Tasks

Regular maintenance tasks include oil changes, filter cleaning, and spark plug checks. Inspect the air filter, cooling system, and battery connections. Follow the manual’s schedule for preventive care to ensure optimal performance and longevity. Refer to specific procedures for guidance on these essential tasks to keep your Vanguard engine running smoothly and efficiently.

Oil and Fuel Recommendations

The Vanguard manual recommends using SAE 30 oil for optimal performance in various conditions. It’s essential to choose the correct oil viscosity based on temperature ranges to ensure proper lubrication. Always use clean, fresh gasoline to maintain engine health and avoid fuel-related issues. Adhering to these guidelines ensures efficient operation, reduces wear, and extends the engine’s lifespan.

Seasonal Preparation and Storage Tips

Proper preparation is crucial for seasonal storage. Drain fuel or use a stabilizer to prevent degradation. Add fresh oil to protect engine components. Clean the engine thoroughly and store in a dry, well-ventilated area. Follow these steps to ensure your Vanguard engine remains in optimal condition during off-season periods and starts reliably when needed again.

Troubleshooting and Repair

Identify common issues like engine surging or poor performance. Check carburetor, ignition, and governor systems. Consult the manual for diagnostic procedures and repair guidelines to ensure optimal engine function.

Diagnosing Engine Problems

Identify issues like surging or poor performance by checking the carburetor, ignition, and governor systems. Consult the manual for diagnostic charts and procedures to systematically troubleshoot problems, ensuring accurate repairs and optimal engine function. Regular diagnostics help prevent major breakdowns and maintain peak performance.

Repairing the Carburetor and Governor Systems

Repairing the carburetor involves cleaning or replacing components like jets and gaskets, while governor system fixes often require adjusting or replacing linkage parts. Always refer to the service manual for specific model guidance. Proper calibration ensures optimal engine performance and prevents damage. Regular maintenance of these systems is crucial for reliable operation.

Replacing Worn or Damaged Parts

Replacing worn or damaged parts ensures optimal engine performance. Use the illustrated parts list to identify components. Purchase genuine parts from authorized dealers. Follow the service manual’s instructions for installation. Regular replacement of worn parts prevents further damage. Always allow the engine to cool before starting repairs and follow safety guidelines to avoid injury or equipment damage.

Understanding the Engine’s Governor System

The Vanguard engine’s governor system regulates speed and ensures efficient operation. It adjusts engine RPM based on load, maintaining performance and preventing overload. Proper adjustment is crucial for optimal function.

Types of Governor Controls

The Vanguard engine features two primary governor control types: wind vane and internal rotation. The wind vane system uses a mechanical vane to regulate engine speed, while the internal rotation method adjusts RPM through engine internals. Both systems ensure consistent performance under varying loads, with the internal rotation being more precise in modern models.

Adjusting the Governor for Optimal Performance

Adjusting the governor on a Briggs and Stratton Vanguard engine involves accessing the governor screw, loosening the nut, and turning the screw to achieve the correct RPM. Tighten the nut securely after adjustment. Always refer to the service manual for specific instructions and safety precautions to ensure optimal performance and avoid engine damage.

Vanguard Engine Parts and Diagrams

The Vanguard engine parts diagrams provide detailed visuals of key components, aiding in identification and repairs. These diagrams, found in the service manual, ensure accurate servicing.

Identifying Key Components

The Vanguard service manual includes detailed diagrams and part lists to help identify key engine components. These visuals guide technicians in locating parts like carburetors, governors, and oil systems. By referencing the engine’s model number, users can accurately identify and service components, ensuring proper maintenance and repairs. This section is crucial for understanding the engine’s structure and functionality.

Using the Illustrated Parts List

The Vanguard service manual’s illustrated parts list provides clear visuals and numbering for each component, helping users identify and order the correct parts efficiently. By referencing the engine’s model number, technicians can locate specific parts quickly and accurately, ensuring proper repairs and maintenance without confusion.

Safety Precautions and Best Practices

Always follow safety guidelines in the manual to avoid hazards, such as allowing the engine to cool before refueling and wearing protective gear during repairs.

General Safety Guidelines

Always follow safety guidelines in the manual to avoid hazards. Allow the engine to cool before refueling, and wear protective gear during repairs. Ensure proper ventilation when working with fuel or electrical components. Keep loose clothing and long hair tied back to prevent accidents. Never work on an engine near open flames or sparks. Ensure all tools and equipment are in good condition and suitable for the task. Familiarize yourself with emergency procedures, such as fire extinguisher locations and first aid kits. Never bypass safety features or ignore warning labels. If unsure about a procedure, consult a professional or the manual for clarification. Regularly inspect the workspace for potential hazards, such as spilled fluids or uneven surfaces. Keep children and pets away from the work area. Ensure proper grounding of equipment to prevent electrical shocks. Always disconnect the battery or power source before starting any repairs. Use jack stands and supports when working under heavy machinery. Never test or operate an engine without proper guards or shields in place. Adhere to local regulations and environmental guidelines when handling fluids and waste. Take regular breaks to avoid fatigue, which can lead to accidents. Stay informed about any recalls or updates related to your engine or tools. Maintain a clean and organized workspace to reduce the risk of tripping or misplacing tools. Always refer to the manual for specific safety instructions tailored to your engine model and type.

Precautions Before Starting Repairs

Always disconnect the battery and ensure the engine is cool before starting repairs. Wear protective gear like gloves and goggles to prevent injuries. Ground the equipment to avoid electrical shocks. Ensure the workspace is clean and well-lit. Use proper tools to avoid damaging components. Consult the manual for specific instructions. Properly ventilate the area when handling fuel or chemicals. Avoid rushing through procedures to prevent mistakes.

Advanced Diagnostic Techniques

Advanced diagnostics involve using specialized tools to interpret error codes, analyze symptoms, and perform detailed system checks for precise troubleshooting and efficient repairs.

Using Specialized Tools for Troubleshooting

Specialized tools such as multimeters, compression testers, and tachometers are crucial for diagnosing engine issues. They help identify problems like faulty spark plugs, low compression, or improper engine timing. Regular use of these tools ensures accurate troubleshooting, enabling efficient repairs and extending engine lifespan. Always refer to the manual for specific tool recommendations and usage guidelines.

Interpreting Error Codes and Symptoms

The service manual helps identify common issues like engine stalling or low power, often caused by faulty spark plugs or carburetor malfunctions. Error codes and symptoms guide technicians to specific problems, ensuring accurate diagnosis and effective repairs. Regular reference to the manual aids in resolving issues promptly, minimizing downtime and extending engine lifespan.

Regular servicing and referencing the manual ensures optimal performance and longevity of your Vanguard engine, while additional resources provide further support for advanced troubleshooting and maintenance needs.

Importance of Regular Servicing

Regular servicing is crucial for maintaining the performance and longevity of your Briggs and Stratton Vanguard engine. It prevents deterioration, ensures reliability, and keeps the engine running at peak efficiency. The service manual provides detailed guidelines for routine tasks, such as oil changes and filter replacements, ensuring optimal performance. Regular maintenance also helps identify potential issues early, reducing the risk of costly repairs. By following the manual’s recommendations, you can extend the engine’s lifespan and ensure consistent power delivery. Seasonal checks and proper storage further safeguard the engine, making regular servicing a vital part of ownership.

Resources for Further Assistance

For additional support, Briggs and Stratton offers extensive resources, including online forums, authorized dealers, and technical support teams. The official website provides downloadable manuals, illustrated parts lists, and troubleshooting guides. Engaging with online communities can also offer practical advice from experienced users and professionals, ensuring comprehensive assistance for any Vanguard engine-related queries or challenges. These resources collectively enhance troubleshooting and maintenance efficiency, providing users with a robust support network to address their needs effectively.

References and Additional Resources

Briggs and Stratton’s official website, authorized dealers, and online forums provide extensive resources, including manuals, parts lists, and expert advice for Vanguard engine maintenance and repair.

Recommended Manuals and Guides

Briggs and Stratton’s official website offers the Vanguard Service Manual, parts lists, and emissions guides. Additional resources include the Small Engine Maintenance Guide (CE8155) and troubleshooting manuals. Authorized dealers provide model-specific repair manuals, while online forums share user experiences and DIY tips for Vanguard engines, ensuring comprehensive support for owners and technicians.

Online Communities and Forums

Online forums and communities, like specialized engine repair groups, offer valuable insights and troubleshooting tips for Briggs and Stratton Vanguard engines. Users share experiences, DIY solutions, and maintenance advice, creating a collaborative resource that complements official manuals. These platforms often include discussions on common issues, repair techniques, and part recommendations, aiding both novice and experienced technicians in resolving engine-related challenges effectively.

canon t50 manual

Welcome to the Canon T50 manual guide! This comprehensive resource helps users understand and master the Canon T50 camera’s features, operations, and troubleshooting․ Perfect for both beginners and experienced photographers, the manual covers essential controls, shooting modes, and maintenance tips to ensure optimal performance․ Explore the sections below for detailed insights and expert advice to enhance your photography experience with the Canon T50․

1․1 Overview of the Canon T50 Camera

The Canon T50 is an iconic 35mm SLR film camera designed for both amateur and professional photographers․ Featuring a built-in motorized film winder, it offers seamless shooting and compatibility with Canon EF lenses․ Its compact design and intuitive controls make it user-friendly, while its advanced programmed AE mode ensures precise exposures․ Paired with the Speedlite 244T, it excels in flash photography, offering versatility and durability for creative photography needs․

1․2 Importance of the Manual for Proper Usage

The Canon T50 manual is essential for understanding the camera’s features, controls, and maintenance․ It provides detailed instructions for loading film, using lenses, and troubleshooting common issues․ By following the manual, users can optimize the camera’s performance, ensure proper care, and resolve technical problems effectively․ It serves as a comprehensive guide to unlock the full potential of the Canon T50 for photographers of all skill levels․

Key Features and Specifications of the Canon T50

The Canon T50 is a 35mm SLR film camera featuring manual controls, interchangeable lenses, and compatibility with the Canon Speedlite 244T flash․ It offers durability and mechanical reliability, making it a popular choice among photography enthusiasts․ The camera supports various shooting modes and ensures high-quality results with precise focusing and exposure control, powered by two AA batteries for extended use․

2;1 Camera Design and Build Quality

The Canon T50 features a rugged, lightweight design with a compact body, making it easy to handle․ Built with durable materials, it ensures mechanical reliability and longevity․ The ergonomic layout provides intuitive access to controls, while the manual focus and aperture adjustments offer precise handling․ Its sturdy construction and user-friendly design make it a reliable choice for photographers seeking both performance and portability․

2․2 Lens Compatibility and Shooting Modes

The Canon T50 is compatible with Canon’s FD-mount lenses, offering a wide range of focal lengths for diverse photography needs․ It features multiple shooting modes, including Programmed AE, Aperture Priority, and Manual modes, allowing photographers to tailor settings for creative control․ The camera’s versatility in lens options and shooting modes makes it adaptable for various lighting conditions and artistic preferences․

2․3 Technical Specifications and Performance

The Canon T50 operates with FD-mount lenses and features a built-in motorized film advance, enabling smooth and efficient shooting․ It supports a range of shutter speeds and offers precise control over exposure settings․ Powered by two AA batteries, the camera delivers reliable performance for both casual and professional photography, ensuring high-quality results across various lighting conditions and shooting scenarios․

How to Use the Canon T50 Camera

Mastering the Canon T50 involves understanding its intuitive controls and features․ This section guides users through loading film, installing batteries, and operating the camera’s essential functions effectively․

3․1 Loading Film and Battery Installation

To start using your Canon T50, insert two AA alkaline batteries into the battery compartment․ Open the film door, align the film leader with the take-up spool, and advance the film using the rapid rewind knob․ Close the door and shoot a test frame to ensure proper loading․ This process ensures your camera is ready for capturing stunning images effortlessly․

3․2 Basic Camera Operations and Controls

Familiarize yourself with the Canon T50’s intuitive controls․ Use the mode dial to select shooting modes like Programmed AE․ Adjust aperture with the aperture ring and shutter speed via the dial․ Press the shutter button halfway to focus and fully to capture․ The film advance lever and rewind knob manage film transportation․ The LCD panel displays settings for easy monitoring and adjustment․

3․4 Mounting and Using Lenses

Mounting a lens on the Canon T50 is straightforward․ Align the lens mount with the camera body and twist until it clicks securely․ Ensure compatibility with FD-series lenses for optimal performance․ Once mounted, adjust settings like aperture and focus as needed․ The camera supports various lenses, allowing flexibility for different shooting scenarios․ Always handle lenses with care to maintain clarity and functionality․

Exposure and Shooting Modes

The Canon T50 offers versatile exposure modes, including Programmed AE, Manual, and Aperture Priority, allowing precise control over lighting and composition․ Use the Speedlite 244T for flash photography․

4․1 Understanding Programmed AE Mode

Programmed AE Mode on the Canon T50 simplifies photography by automatically adjusting aperture and shutter speed for optimal exposure․ Ideal for beginners, this mode handles various lighting conditions effortlessly․ The camera analyzes the scene and selects the best settings, ensuring balanced results․ Use Programmed AE for quick, hassle-free shooting while maintaining creative control with optional adjustments․

4․2 Using Manual Exposure and Aperture Priority

Manual Exposure mode offers full control over aperture and shutter speed for precise results․ Aperture Priority mode allows you to set the aperture while the camera adjusts the shutter speed, ideal for controlling depth of field․ These modes provide creative flexibility, enabling photographers to tailor exposures to their artistic vision and achieve professional-quality images effortlessly․

4․3 Flash Photography with the Canon Speedlite 244T

The Canon Speedlite 244T enhances flash photography with the T50, offering balanced exposures and improved lighting control․ Attaching via the hot shoe, it synchronizes with the camera’s shutter for optimal results, minimizing overexposure and ensuring vibrant images in various lighting conditions․ This external flash unit is ideal for capturing professional-quality photos with precise illumination and creative flexibility․

Focusing and Metering

Explore the focusing techniques and metering systems of the Canon T50․ Learn how to use autofocus for quick shots, manual focus for precision, and center-weighted metering for balanced exposures․

5․1 Autofocus and Manual Focus Techniques

Master the Canon T50’s autofocus system for quick, precise subject capture․ Use AF lock to recompose shots without refocusing․ For manual focus, employ the lens focus ring and viewfinder cues for exact control, especially in low light or for creative depth-of-field effects․ Balance autofocus speed with manual precision to tailor your shots to every situation․

5․2 Center-Weighted Metering and Exposure Compensation

The Canon T50 features center-weighted metering, which measures light across the entire frame while prioritizing the center area․ This mode is ideal for portraits and balanced exposures․ Use exposure compensation to adjust brightness by ±2 EV in 1/3-stop increments, ensuring correctly lit images in challenging lighting conditions like backlit scenes or high contrast situations for optimal results every time․

Accessories for the Canon T50

Enhance your Canon T50 experience with compatible accessories like the Speedlite 244T flash, tripods, and camera bags․ These tools improve functionality, protection, and convenience for photographers on the go․

6․1 Compatible Flash Units and Accessories

The Canon T50 is compatible with the Speedlite 244T flash unit, offering advanced flash photography capabilities․ Additional accessories include remote triggers, diffusers, and reflectors to enhance lighting control and creativity․ These tools expand the camera’s functionality, ensuring versatile and professional results in various shooting conditions․ Explore compatible options to maximize your T50’s potential for stunning images․

6․2 Recommended Tripods and Camera Bags

For stability and convenience, consider using a sturdy tripod with the Canon T50․ Look for models with adjustable heights and durable materials to ensure smooth operation․ Camera bags should be padded for protection, with compartments for lenses, film, and accessories․ Choose bags that are both functional and stylish to suit your photography needs and preferences effectively․

Troubleshooting Common Issues

Identify and resolve common problems with the Canon T50, such as battery drainage or shutter malfunctions․ Consult the manual or seek professional assistance for persistent issues․

7․1 Resolving Battery and Shutter Issues

If your Canon T50 experiences battery drain or shutter malfunctions, check the battery contacts for dirt or corrosion․ Replace worn-out batteries with fresh ones, ensuring they are properly seated․ For shutter issues, clean the blades gently with a soft brush or refer to the service manual for detailed repair instructions․ Regular maintenance can prevent such problems․

7․2 Fixing Common Errors and Malfunctions

Common errors on the Canon T50 may include film loading issues, error messages, or viewfinder malfunctions․ Ensure the film is loaded correctly and check for obstructions in the film path․ For error messages, consult the manual or reset the camera by removing and reinserting the batteries․ Persistent issues may require professional repair to maintain optimal performance and longevity of your camera․

Maintenance and Care

Regularly clean the camera and lenses with a soft cloth to prevent dust buildup․ Store the Canon T50 in a dry, cool place away from direct sunlight to maintain functionality and longevity․ Always handle the camera with care to avoid scratches and damage, ensuring optimal performance for years to come․

8․1 Cleaning the Camera and Lenses

Regular cleaning is essential for maintaining the Canon T50’s performance․ Use a soft, dry cloth to wipe the camera body and lens surfaces, avoiding harsh chemicals․ For lenses, gently remove smudges with a microfiber cloth and a specialized lens cleaning solution․ Clean the viewfinder and mirrors with care to prevent scratches․ Store lenses in protective cases to minimize dust exposure and ensure sharp, clear images․

8․2 Proper Storage and Handling Techniques

Store the Canon T50 in a cool, dry place, away from direct sunlight and moisture․ Use silica gel packets to prevent humidity damage․ Always handle the camera and lenses with clean, dry hands to avoid fingerprints and smudges․ Protect the lens with a cap when not in use and store the camera in a padded case or bag for safe transportation and long-term preservation․

Canon T50 Service Manual

The Canon T50 service manual provides detailed repair and maintenance instructions for advanced users and technicians․ It includes troubleshooting guides, diagrams, and parts lists for professional servicing․ Available as a downloadable PDF, the manual ensures comprehensive care and repair solutions for the Canon T50 camera, helping users maintain optimal performance and extend its lifespan․

9․1 Understanding the Service Manual

The Canon T50 service manual is a detailed guide for advanced users and technicians․ It provides step-by-step repair procedures, diagrams, and parts lists․ Available as a downloadable PDF, the manual covers troubleshooting, maintenance, and DIY repairs․ Understanding the service manual is essential for resolving complex issues and ensuring the camera operates at its best․ It’s a valuable resource for extending the camera’s lifespan and optimizing performance․

9․2 DIY Repairs and Maintenance Tips

Performing DIY repairs and maintenance on your Canon T50 can save time and money․ Common fixes include cleaning the shutter, adjusting the aperture, and replacing worn seals․ Use original parts and follow the service manual for precise instructions․ Regularly cleaning the lens and camera body prevents dust buildup․ For battery issues, ensure proper installation and avoid mixing old and new cells․ Always refer to the service manual for guidance to avoid damage․

Downloading the Canon T50 Manual

The Canon T50 manual is available online as a PDF․ Visit trusted sources like Christian Rollinger’s website or Mike Butkus’ camera manuals archive for free downloads․ Ensure Adobe Reader is installed to view the file․ This resource provides detailed instructions for optimal camera usage and troubleshooting․

10․1 Sources for the PDF Manual

The Canon T50 manual is available as a PDF from various trusted sources․ Visit Christian Rollinger’s website or Mike Butkus’ camera manuals archive for free downloads․ Additionally, Canon’s official website and other reputable photography resources offer the manual․ Ensure you have Adobe Reader installed to access the file, which is typically around 2․7MB in size for easy downloading and reference․

10․2 Navigating the Manual for Quick Reference

The Canon T50 manual is structured for easy navigation․ Use the table of contents to quickly locate sections like camera setup, shooting modes, and troubleshooting․ The PDF format allows keyword searching, enabling fast access to specific topics․ Bookmark frequently used pages, such as technical specifications or maintenance tips, for convenient reference and efficient learning․

Mastering the Canon T50 manual empowers you to unlock its full potential․ Use the insights and tips provided to enhance your photography skills and creativity effectively;

11․1 Final Tips for Getting the Most Out of the Canon T50

To maximize your Canon T50 experience, experiment with its versatile shooting modes and accessories like the Speedlite 244T for enhanced flash photography․ Regularly clean and maintain your camera to ensure optimal performance․ Explore Mike Butkus’ manuals for additional insights and troubleshooting․ Practice various techniques, stay updated with firmware, and join photography communities for shared knowledge and inspiration․

2017 jeep grand cherokee manual

The 2017 Jeep Grand Cherokee manual serves as a comprehensive guide for owners, detailing operation, maintenance, and features to ensure optimal performance and safety.

Overview of the Vehicle and Manual Importance

The 2017 Jeep Grand Cherokee manual is essential for understanding the vehicle’s features, operation, and maintenance. It provides detailed guidance on maximizing performance, safety, and longevity. The manual covers everything from basic controls to advanced systems, ensuring drivers can utilize the SUV’s capabilities effectively. Whether navigating off-road terrains or city roads, the manual serves as a vital resource for troubleshooting and optimizing the driving experience. Adhering to its recommendations helps maintain the vehicle’s reliability and enhances overall satisfaction.

Key Features and Specifications of the 2017 Jeep Grand Cherokee

The 2017 Jeep Grand Cherokee offers a blend of luxury and off-road prowess, with five trim levels, powerful engine options, and advanced infotainment systems.

Engine Options and Performance Capabilities

The 2017 Jeep Grand Cherokee offers a range of engine options, including a 3.6L V6, 5.7L V8, and a 6.4L V8 in the SRT model. The engines deliver between 295 to 707 horsepower, ensuring robust performance for both on-road and off-road driving. These powertrains are paired with an 8-speed automatic transmission, providing smooth shifting and enhanced fuel efficiency. The V6 engine achieves up to 26 MPG on the highway, while the V8 models offer impressive towing capabilities, making the Grand Cherokee versatile for various driving needs and conditions.

Trim Levels and Available Packages

The 2017 Jeep Grand Cherokee is available in five trim levels: Laredo, Limited, Trailhawk, Overland, and Summit. Each trim offers unique features, such as the Trailhawk’s off-road-oriented design with a disconnecting front sway bar and enhanced traction control. The Overland and Summit trims provide luxury upgrades, including premium leather interiors and advanced infotainment systems. Additional packages, like the Off-Road Adventure II and Luxury Group, allow customization with features such as skid plates, dual-pane sunroofs, and high-performance audio systems, catering to diverse driver preferences and needs.

Interior and Infotainment System Details

The 2017 Jeep Grand Cherokee features a refined interior with premium materials and advanced technology. The Uconnect infotainment system includes a touchscreen display, Apple CarPlay, and Android Auto compatibility. Higher trims offer a 19-speaker Harman Kardon audio system and a dual-pane sunroof for enhanced comfort. Heated and ventilated front seats, along with a heated steering wheel, provide luxury and convenience. The interior design balances ruggedness with sophistication, making it suitable for both off-road adventures and daily commuting, while the intuitive controls ensure a seamless driving experience.

Maintenance and Service Schedule

The 2017 Jeep Grand Cherokee manual outlines a detailed maintenance schedule, including oil changes, tire rotations, and other essential services to ensure optimal performance and longevity.

Recommended Maintenance Intervals

The 2017 Jeep Grand Cherokee manual specifies regular maintenance intervals to ensure vehicle health. Oil changes are recommended every 7,500 miles, with tire rotations every 12,000 miles. The manual also advises inspecting brakes, belts, and fluids at specific intervals. Proper adherence to these schedules helps prevent issues and extends the vehicle’s lifespan. Routine checks ensure optimal performance, especially for off-road use. Following these guidelines is crucial for maintaining reliability and safety.

Oil Change and Fluid Requirements

The 2017 Jeep Grand Cherokee manual recommends oil changes every 7,500 miles under normal conditions. Synthetic oil (5W-20 or 5W-30) is required for optimal performance. Fluid levels, including coolant, transmission, and brake fluids, should be checked regularly. The manual specifies using only approved fluids to maintain warranty and performance. Proper oil and fluid maintenance ensures engine longevity and prevents damage. Always refer to the manual for precise specifications and guidelines to avoid subpar performance or potential system failures.

Tire Rotation and Pressure Guidelines

The 2017 Jeep Grand Cherokee manual recommends tire rotation every 7,500 miles to ensure even wear. Use the specified rear-to-front and side-to-side patterns. Tire pressure should be checked monthly, with levels set to 35 PSI for most trims under normal conditions. Proper tire maintenance enhances handling, fuel efficiency, and safety. Failure to follow guidelines can lead to uneven wear and reduced performance. Always refer to the manual for precise specifications, as pressures may vary based on driving conditions or specific trim levels.

Safety Features and Driver Assistance Systems

The 2017 Jeep Grand Cherokee offers advanced safety features, including forward collision warning, adaptive cruise control, and lane departure warning, enhancing driver confidence and vehicle security.

Advanced Safety Technologies Included

The 2017 Jeep Grand Cherokee incorporates cutting-edge safety technologies, such as forward collision warning, adaptive cruise control, and lane departure warning. These systems enhance driver awareness and assist in preventing accidents. Additional features include automatic emergency braking, blind-spot monitoring, and rear cross-path detection, providing comprehensive protection on the road. The vehicle also offers advanced airbag systems and a robust structure to ensure occupant safety. These technologies work together to create a secure and confidence-inspiring driving experience, whether on highways or off-road terrains.

Driver Assistance Systems Overview

The 2017 Jeep Grand Cherokee features a suite of driver assistance systems designed to enhance convenience and safety. These include adaptive cruise control, which maintains a set distance from the vehicle ahead, and lane departure warning with assist, which gently corrects steering if the vehicle drifts out of its lane. Additionally, the SUV offers park assist for effortless parallel and perpendicular parking, as well as hill start assist to prevent rollback on inclines. These systems work seamlessly to provide a more confident and controlled driving experience in various conditions.

Off-Road and Towing Capabilities

The 2017 Jeep Grand Cherokee excels in off-road and towing capabilities, featuring a robust four-wheel-drive system, up to 7,400 lbs towing capacity, and advanced hill descent control, making it a top choice for outdoor enthusiasts.

Four-Wheel-Drive Systems and Modes

The 2017 Jeep Grand Cherokee features advanced four-wheel-drive systems, including Quadra-Trac I and Quadra-Trac II, offering seamless power distribution for enhanced traction. Quadra-Trac I provides automatic 4×4 engagement for everyday driving, while Quadra-Trac II includes a two-speed transfer case and neutral mode for towing. The Selec-Terrain traction management system allows drivers to optimize performance for snow, sand, mud, or rock. These systems ensure superior off-road capability and stability, making the Grand Cherokee a leader in versatility and performance across diverse terrains.

Towing Capacity and Guidelines

The 2017 Jeep Grand Cherokee offers a maximum towing capacity of up to 7,200 pounds, depending on the engine and configuration. Properly equipping the vehicle with a hitch receiver and wiring harness is essential for safe towing. Always refer to the owner’s manual for specific towing instructions and weight limits to ensure safety and compliance with manufacturer recommendations. Adhering to these guidelines helps prevent damage to the vehicle and ensures secure towing operations under various conditions.

Technical Specifications and Dimensions

The 2017 Jeep Grand Cherokee features a wheelbase of 114.3 inches, an overall length of 189.8 inches, and a width of 77.1 inches. Its height is approximately 69.3 inches, with a curb weight ranging around 4,500 pounds, depending on the trim. These dimensions ensure balanced on-road stability and off-road capability, making it a versatile choice for various driving conditions.

Vehicle Dimensions and Weight

The 2017 Jeep Grand Cherokee has a wheelbase of 114.3 inches, an overall length of 189.8 inches, and a width of 77.1 inches; It stands at 69.3 inches tall, with a curb weight ranging from approximately 4,500 to 5,200 pounds, depending on the trim level. These dimensions ensure a stable and robust build, while the weight distribution enhances its towing capacity and overall performance, making it suitable for both on-road and off-road driving experiences.

Engine and Transmission Details

The 2017 Jeep Grand Cherokee offers a range of powerful engines, including a 3.6L V6 delivering 295 horsepower and 260 lb-ft of torque, and a 5.7L V8 producing 360 horsepower and 390 lb-ft of torque. The SRT trim features a 6.4L V8 with 475 horsepower and 470 lb-ft of torque. All engines are paired with an 8-speed automatic transmission, ensuring smooth shifting and optimal performance. The SRT model includes a high-performance 8-speed transmission for enhanced acceleration and responsiveness, making it a standout option for power enthusiasts.

Frequently Asked Questions and Troubleshooting

Common issues include error codes, dashboard warnings, and maintenance reminders. Solutions often involve resetting systems or consulting diagnostic tools. Refer to the manual for detailed guidance.

Common Issues and Solutions

Common issues with the 2017 Jeep Grand Cherokee include error codes, dashboard warnings, and maintenance reminders. Solutions often involve resetting systems or checking connections. For example, error codes like “Check Engine” may indicate loose gas caps or sensor malfunctions. Electronic system glitches can sometimes be resolved by restarting the infotainment system. Drivers are advised to consult the manual for troubleshooting steps or use diagnostic tools like AlfaOBD for advanced issues. Regular maintenance, such as oil changes and tire rotations, can prevent many problems; Always refer to the manual for detailed solutions to avoid costly repairs.

Diagnostic Tools and Error Codes

The 2017 Jeep Grand Cherokee manual highlights the use of diagnostic tools like AlfaOBD for troubleshooting and configuring vehicle systems. Error codes, such as “Check Engine” alerts, often indicate issues like loose gas caps or sensor malfunctions. These tools help identify problems and guide repairs. Regular use of diagnostic tools can prevent minor issues from becoming major concerns. Always consult the manual for code interpretations and solutions to ensure proper vehicle maintenance and functionality.

Warranty and Support Information

The 2017 Jeep Grand Cherokee comes with a comprehensive factory warranty, including powertrain and basic coverage. Dealerships offer genuine MOPAR parts and factory-trained technicians for reliable service. Owners can access recall information through their VIN and receive support from authorized service centers, ensuring peace of mind and optimal vehicle performance. Regular maintenance is key to maintaining warranty validity and overall vehicle health. Consult the manual for detailed warranty terms and conditions. Additionally, customer support is available for any inquiries or concerns about the vehicle’s maintenance and operation. The manual emphasizes the importance of adhering to recommended maintenance schedules to prevent voiding the warranty. For any issues, owners are encouraged to contact their local Jeep service center for assistance. This ensures that the vehicle remains in excellent condition and that any potential problems are addressed promptly. By following the guidelines outlined in the manual, owners can maximize their warranty benefits and enjoy a hassle-free ownership experience. The combination of a robust warranty and dedicated support makes the 2017 Jeep Grand Cherokee a reliable choice for drivers seeking durability and long-term satisfaction.

Factory Warranty Details

The 2017 Jeep Grand Cherokee is backed by a comprehensive factory warranty, including a 3-year/36,000-mile basic warranty and a 5-year/60,000-mile powertrain warranty. Additional coverage includes rust-through protection for 5 years and unlimited miles, as well as a battery warranty for 8 years or 150,000 miles. The manual emphasizes the importance of adhering to maintenance schedules to uphold warranty validity. Dealerships provide genuine MOPAR parts and factory-trained technicians for covered repairs. This warranty ensures long-term reliability and peace of mind for owners, covering essential components and systems. Regular maintenance is crucial to maintaining coverage and overall vehicle health. The warranty also includes roadside assistance for added convenience. By following the manual’s guidelines, owners can maximize their warranty benefits and enjoy a hassle-free ownership experience. This comprehensive coverage underscores Jeep’s commitment to durability and customer satisfaction. The warranty details are fully outlined in the manual, providing clear terms and conditions for owners. Proper adherence ensures optimal performance and protection for years to come. The combination of extensive coverage and dedicated support makes the 2017 Jeep Grand Cherokee a reliable choice for drivers seeking long-term satisfaction and minimal maintenance costs.

Customer Support and Service Centers

The 2017 Jeep Grand Cherokee manual highlights Jeep’s dedicated customer support network, ensuring owners have access to assistance and service. Certified dealerships, equipped with factory-trained technicians and genuine MOPAR parts, provide expert maintenance and repairs. Owners can also utilize online resources, such as vehicle recall checks by VIN and Mopar account access, for updates and support. Additionally, Jeep’s customer support team is available to address inquiries and concerns, reinforcing the brand’s commitment to reliability and customer satisfaction. Regular maintenance at authorized centers ensures optimal performance and extends the vehicle’s lifespan.

The 2017 Jeep Grand Cherokee manual is essential for optimal vehicle performance and safety. It underscores the importance of proper maintenance and operation, ensuring reliability and satisfaction.

Importance of Adhering to the Manual

Adhering to the 2017 Jeep Grand Cherokee manual ensures safety, proper operation, and optimal performance. It provides essential guidelines for maintenance, troubleshooting, and understanding advanced features. By following the manual, owners can prevent potential issues, extend the vehicle’s lifespan, and maintain warranty coverage. It also helps drivers understand new technologies and improve driving habits. Regular maintenance, as outlined, prevents breakdowns and ensures reliability. The manual is a vital resource for maximizing the vehicle’s capabilities and ensuring a smooth, enjoyable ownership experience.

Jeep Grand Cherokee as a Reliable Choice

The 2017 Jeep Grand Cherokee is renowned for its reliability, durability, and versatility. It seamlessly blends off-road prowess with on-road comfort, making it a top choice for adventurers and daily commuters alike. With advanced safety features, robust engine options, and a luxurious interior, the Grand Cherokee delivers a dependable and enjoyable driving experience. Its reputation for withstanding tough conditions and providing consistent performance solidifies it as a trusted vehicle for drivers seeking both adventure and reliability.

amana washing machine troubleshooting manual

This guide provides a comprehensive approach to diagnosing and resolving common issues with Amana washing machines, empowering users to troubleshoot effectively, saving time and money, and optimizing performance for longevity.

Overview of Common Issues

Amana washing machines, like any appliance, can experience issues such as not filling with water, lid lock malfunctions, or excessive noise during operation. These problems often stem from clogged filters, faulty sensors, or improper detergent usage. Error codes may appear, signaling specific issues, and understanding them is crucial for effective troubleshooting. Regular maintenance, such as cleaning the drain pump and checking water supply lines, can prevent many of these problems. Additionally, users may encounter issues with the control panel or unbalanced loads, leading to vibration or operational disruptions. Addressing these common issues promptly ensures optimal performance and extends the lifespan of the machine.

Importance of Referencing the User Manual

Referencing the user manual is essential for effective troubleshooting of your Amana washing machine. It provides model-specific guidance, ensuring accurate diagnoses and solutions tailored to your appliance. The manual details error codes, diagnostic modes, and maintenance routines, empowering users to address issues confidently. By following the manual, you can avoid costly repairs and prolong the machine’s lifespan. It also offers safety precautions and warranty information, protecting both you and your appliance. Familiarizing yourself with the manual enables quick identification of common problems, such as clogged filters or improper detergent usage. This resource is indispensable for resolving issues efficiently and maintaining optimal performance.

Common Problems and Solutions

Amana washing machines may face issues like not filling with water, lid lock problems, or excessive noise. Identifying these problems early ensures quick and effective solutions, preventing further damage and extending appliance lifespan. Proper troubleshooting steps and maintenance can resolve most issues, restoring optimal performance. Addressing these common problems promptly helps maintain efficiency and reliability, ensuring your washing machine operates smoothly for years to come.

Washing Machine Not Filling with Water

If your Amana washing machine isn’t filling with water, start by checking the water supply hoses for kinks or blockages. Ensure the water supply valves are fully open. A faulty water inlet valve or malfunctioning water level sensor could also be the cause. Inspect the filter screens in the water inlet hoses for debris and clean them if necessary. If the issue persists, consider replacing the water inlet valve or sensor. Additionally, verify that the machine is properly connected to a water source and that there are no error codes indicating a system failure. Resetting the machine or running a diagnostic mode may also resolve the issue. Regular maintenance, such as cleaning filters, can help prevent this problem from recurring.

Lid Lock Issues and Resetting the Machine

If your Amana washing machine is experiencing lid lock issues, start by ensuring the lid is closing properly and free from obstructions. Check for any debris or laundry items that might be preventing the lid from locking. If the lid lock mechanism appears faulty, consider testing it or replacing it if necessary. Resetting the machine can often resolve the problem—unplug it, wait a few minutes, and then plug it back in to reset any error codes. Consulting the user manual for specific instructions on lid lock issues for your model is recommended. If these steps fail, contacting a professional may be required to avoid further damage. Additionally, exploring troubleshooting videos or forums for similar issues can provide valuable insights or confirmation of the solution.

Excessive Noise or Vibration During Operation

Excessive noise or vibration in your Amana washing machine can be caused by an unbalanced load, faulty bearings, or a loose drum. Start by ensuring the machine is level—adjust the feet if necessary. Check for foreign objects like coins or zippers that may be causing noise. A malfunctioning motor or worn-out suspension rods could also be the culprit. If the issue persists, inspect the tub bearings for damage. Refer to your user manual for specific diagnostic steps. In some cases, resetting the machine or running a diagnostic cycle may help. If the problem remains unresolved, consult a professional to avoid further damage to the machine. Always prioritize safety and follow manufacturer guidelines for repairs.

Identifying Error Codes

Error codes on your Amana washing machine indicate specific issues. Refer to the user manual to find the meaning of each code and troubleshooting steps. Always follow the diagnostic guide provided for accurate solutions.

Understanding Error Code Meanings

Understanding error codes is crucial for effective troubleshooting of your Amana washing machine. Each error code corresponds to a specific issue, such as problems with water supply, drainage, or sensor malfunctions. Referencing the user manual is essential, as it provides detailed explanations for each code. For example, codes like “E1” or “E2” often indicate issues with water filling or temperature sensors. By deciphering these codes, you can identify the root cause of the problem and apply the appropriate solution. This step saves time and ensures that repairs are done correctly. Familiarize yourself with the code meanings to diagnose issues efficiently and maintain your washer’s optimal performance. Regular code checks can also prevent minor problems from escalating into major repairs.

How to Reset Error Codes

To reset error codes on your Amana washing machine, start by unplugging the power cord from the outlet. Wait for about 30 seconds to allow the machine to reset its systems. Plug the cord back in and check if the error code has cleared. If the issue persists, refer to the user manual for specific reset instructions, as some models may require pressing a combination of buttons. For example, certain models may need you to press and hold the “Start/Stop” and “Power” buttons simultaneously for a few seconds. After resetting, run a test cycle to ensure the error has been resolved. If the code reappears, further troubleshooting or professional assistance may be necessary to address the underlying issue;

Using the Diagnostic Mode

Diagnostic mode helps identify issues by running internal tests, displaying error codes, and guiding repairs. Follow model-specific instructions to activate and interpret results effectively.

Steps to Activate Diagnostic Mode

To activate diagnostic mode on your Amana washing machine, ensure the machine is in standby mode. Press and hold the Power and Start/Pause buttons simultaneously for 3-5 seconds. Release the buttons when the display lights flash. Next, select a cycle (e.g., Normal or Heavy Duty) and ensure the water temperature is set to Hot. Press and hold the Start/Pause button again for 3 seconds to enter diagnostic mode. The machine will run a series of internal tests, displaying error codes if any issues are detected. Use the control panel to navigate through test results. Once done, press Power to exit diagnostic mode and resume normal operation. Always consult your user manual for model-specific instructions.

Interpreting Diagnostic Results

After activating diagnostic mode, the Amana washing machine will display error codes or flash LED lights to indicate specific issues. Each error code corresponds to a particular problem, such as a faulty sensor or a blocked drain pump. Refer to your user manual to match the code or light pattern with its meaning. For example, a blinking lid lock light may indicate a lid lock failure, while a specific code could signal an imbalance or water supply issue. Once identified, address the problem by following the manual’s repair guidance or performing the recommended reset procedure. Accurate interpretation ensures effective troubleshooting and prevents further damage to the machine. Always record the results for future reference if needed.

Maintenance Tips to Prevent Issues

Regular maintenance is key to preventing Amana washing machine issues. Clean the filter and drain pump, check detergent usage, ensure proper water supply, and run cleaning cycles to maintain optimal performance and avoid common problems;

Cleaning the Filter and Drain Pump

Cleaning the filter and drain pump is essential for maintaining your Amana washing machine’s performance. Regularly inspect and remove debris from the filter, located at the bottom of the washer, to ensure proper water flow. The drain pump filter often accumulates lint, coins, or small items, which can cause drainage issues. Turn off the power, then locate and remove the filter according to your user manual instructions. Rinse it thoroughly with warm water and mild detergent before reinstalling. Additionally, run a cleaning cycle or a hot water rinse with vinegar to remove built-up residue. Cleaning these components prevents odors, poor drainage, and potential damage to the machine. Always refer to your manual for specific guidance tailored to your model.

Proper Detergent Usage

Using the correct amount and type of detergent is crucial for optimal performance of your Amana washing machine. Excessive detergent can leave residue on clothes and cause mechanical issues, while too little may result in poor cleaning. Always follow the detergent manufacturer’s instructions for dosage, as overloading can lead to excessive foam and poor drainage. Use high-efficiency (HE) detergent if recommended by your machine’s user manual, as it’s designed to produce fewer suds. Avoid using chlorine-based detergents unless specified, as they may damage certain components. Proper detergent usage ensures cleaner clothes, prevents maintenance issues, and extends the lifespan of your washing machine. Refer to your manual for specific guidelines tailored to your model.

Regular maintenance and understanding common issues can extend your Amana washer’s life. Follow these tips to ensure optimal performance and troubleshoot effectively for lasting reliability and efficiency.

Final Tips for Effective Troubleshooting

Always start by consulting your Amana washing machine’s user manual for model-specific guidance. Regularly clean filters and check hoses to prevent common issues like poor drainage or low water flow. If error codes appear, reset the machine or refer to the diagnostic mode for clarity. Avoid overloading the washer, as this can cause imbalance and excessive noise. Use the recommended detergent dosage to maintain optimal performance. If problems persist, consider professional assistance to avoid further damage. By following these steps, you can extend the lifespan of your Amana washer and ensure efficient operation. Stay proactive with maintenance to minimize future troubleshooting needs.

wayne dalton garage door opener owner’s manual

Welcome to the Wayne Dalton Garage Door Opener Owner’s Manual! This guide provides essential information for safe installation, operation, and maintenance of your garage door opener.

Purpose and Scope of the Manual

This manual is designed to assist homeowners and installers in understanding and operating Wayne Dalton garage door openers safely and effectively. It covers installation, operation, maintenance, and troubleshooting, ensuring optimal performance and longevity. The guide is tailored for residential use, providing clear instructions and safety precautions to prevent accidents. By following this manual, users can maximize the functionality and security of their garage door opener while adhering to manufacturer recommendations.

Important Safety Precautions

Always follow safety guidelines when installing or operating your Wayne Dalton garage door opener. Ensure the area is clear of obstacles and keep children away. Avoid touching moving parts and never stand under the door while it’s in motion. Test the automatic reverse mechanism regularly and ensure safety sensors are properly aligned. Disconnect power before performing maintenance or repairs. Adhere to all warnings and instructions to prevent accidents and ensure safe operation of your garage door opener.

Key Features of Wayne Dalton Garage Door Openers

Wayne Dalton garage door openers offer advanced technology, including keyless entry systems and remote controls, ensuring security and convenience for seamless garage door operation and control.

Overview of Models and Specifications

Wayne Dalton offers a range of garage door opener models, including the Classic Drive and TorqueMaster 9100, designed for residential use; These models feature 1/2 HP motors, ensuring smooth and reliable operation. The TorqueMaster 9100 includes advanced DIP switches for easy setup and compatibility with LiftMaster systems. All models are energy-efficient and come with a 1-year warranty. They also support keyless entry systems and integrate with smart home technologies for enhanced convenience and security.

Advanced Technology and Security Features

Wayne Dalton garage door openers feature advanced security technologies like rolling code encryption, ensuring secure remote access. The MyQ® smart home system allows users to monitor and control their garage doors remotely via smartphones. Additionally, models integrate with systems like Elkon and GECO, offering seamless smart home integration. Keyless entry systems provide convenient access without physical keys, enhancing security and ease of use for homeowners.

Installation and Assembly Instructions

Follow the step-by-step guide for safe and proper installation. Begin with pre-installation checks, assemble components carefully, and ensure all parts are securely fastened. Conduct post-installation testing to verify smooth operation.

Pre-Installation Checks and Requirements

Before installing your Wayne Dalton garage door opener, ensure the garage door is balanced and operates smoothly. Verify the ceiling height, door size, and available space to confirm compatibility. Check for proper electrical connections and ensure all safety sensors are aligned. Review the manual for specific torque settings and assembly requirements. Familiarize yourself with the emergency release mechanism and ensure all components are included in the packaging. Ensure the door is clear of obstructions for safe operation.

Step-by-Step Installation Guide

Mount the rail assembly securely to the garage ceiling, ensuring proper alignment with the door. Attach the motor unit to the rail, following torque specifications. Connect the chain or belt to the door opener and door, adjusting tension as needed. Install safety sensors 6 inches above the floor on both sides. Wire the emergency release and test the door’s operation. Program the remote control and keyless entry, ensuring all features function correctly. Double-check all connections and test the door opener thoroughly before regular use.

Post-Installation Testing and Adjustments

After installation, test the garage door opener by operating it through a full cycle. Ensure it stops and reverses upon encountering obstacles. Adjust the sensitivity settings if necessary. Check the alignment of safety sensors and verify they are functioning correctly. Test the emergency release mechanism to ensure it disengages properly. Lubricate moving parts as needed and inspect all connections for tightness. Finally, confirm that the remote control and keyless entry systems are synchronized and operating smoothly with the opener.

Safety Features and Best Practices

Ensure proper function of safety sensors and automatic reverse mechanisms. Regularly test door operation and keep clear of moving parts during cycles. Always follow manual guidelines.

Automatic Reverse Mechanism

The automatic reverse mechanism is a critical safety feature designed to prevent accidents. If the door encounters an obstruction while closing, it will automatically stop and reverse direction. This ensures the safety of people, pets, and objects in its path. Regular testing of this feature is essential to ensure proper function. Always follow the manufacturer’s instructions for testing and maintenance to guarantee optimal performance and safety. This feature is a cornerstone of Wayne Dalton’s commitment to user protection and convenience.

Emergency Release and Safety Sensors

The emergency release mechanism allows manual operation of your garage door during power outages or system failures. Simply pull the red emergency release handle to disconnect the door from the opener. Safety sensors, located near the floor, detect obstacles and prevent the door from closing. These sensors must be aligned properly to function correctly. Ensure they are clean and free from obstructions for reliable operation. Regularly test these features to maintain safety and functionality, as instructed in the owner’s manual.

Troubleshooting Common Issues

Troubleshooting common issues with your Wayne Dalton garage door opener involves identifying problems like sensor misalignment or remote control malfunctions. Refer to your manual for solutions and regular checks.

Diagnosing and Resolving Operational Problems

Diagnosing operational issues with your Wayne Dalton garage door opener begins with identifying symptoms like erratic operation or complete stoppage. Check sensors for alignment and obstructions. Ensure power supply is stable. Consult the manual for specific error codes. If remote control fails, reprogram or replace batteries. Lubricate moving parts if stuck. Refer to troubleshooting sections for detailed solutions to restore functionality efficiently. Regular maintenance can prevent such issues. Always follow safety guidelines during repairs.

Resetting the Garage Door Opener

Resetting your Wayne Dalton garage door opener involves locating the SMART/LEARN button, typically found on the opener or remote. Press and hold this button for 5-10 seconds until the indicator light flashes. Release and wait for the system to reset. After resetting, reprogram your remote controls and keyless entry if necessary. Ensure proper alignment of safety sensors to avoid issues. Always refer to your manual for model-specific instructions. Resetting restores default settings, resolving many operational issues effectively.

Maintenance and Care Tips

Regular lubrication of moving parts and cleaning sensors ensure smooth operation. Schedule annual professional inspections for optimal performance and safety of your Wayne Dalton garage door opener.

Regular Maintenance Schedule

A regular maintenance schedule is crucial for ensuring the longevity and efficiency of your Wayne Dalton garage door opener. Start by lubricating all moving parts, such as hinges and rollers, every six months to reduce friction and wear. Additionally, inspect the garage door tracks for any debris or misalignment and clean them as needed. Check the condition of the springs and cables annually, and replace any worn or damaged components promptly. Schedule a professional inspection at least once a year to identify and address potential issues before they escalate; This proactive approach will help maintain smooth operation and prevent costly repairs down the line.

Cleaning and Lubricating Moving Parts

Regular cleaning and lubrication are essential for maintaining the smooth operation of your Wayne Dalton garage door opener. Start by wiping down the tracks with a soft cloth to remove dirt and debris. Lubricate the rollers, hinges, and springs using a silicone-based spray lubricant. Avoid using grease, as it can attract dust and dirt. Apply lubricant sparingly to prevent excess buildup. Clean and lubricate these parts every three to six months, or more frequently if your garage door is used heavily. This will ensure optimal performance and reduce wear on moving components.

Remote Controls and Keyless Entry Systems

Wayne Dalton garage door openers offer convenient remote controls and keyless entry systems for secure and easy access to your garage, enhancing operational convenience and security.

Programming the Remote Control

Programming your Wayne Dalton remote control ensures seamless operation of your garage door opener. Follow the steps in your manual to sync the remote with the opener. For most models, press and hold the SMART/LEARN button until the LED lights flash, then press the remote button to pair. Ensure the door is closed during programming. Refer to your specific model’s instructions, such as the 309964 keyless entry system, for detailed guidance. Always test the remote after programming to confirm proper function.

Keyless Entry System Setup and Usage

Setting up the keyless entry system enhances convenience for operating your Wayne Dalton garage door opener. Start by locating the SMART/LEARN button on your opener. Press and hold it to activate the learning mode. Enter your desired 4-digit PIN on the keyless entry pad and press Enter. The system will confirm successful programming with a light flash. For usage, simply enter your PIN and press Enter to open or close the door. Always test the system after setup to ensure proper functionality and security.

Warranty Information and Customer Support

Wayne Dalton offers a comprehensive warranty covering parts and labor for specific periods. Contact their customer service for assistance with repairs, replacements, or technical inquiries.

Understanding the Warranty Coverage

Wayne Dalton products are backed by a limited warranty, covering defects in materials and workmanship. The warranty period varies by product, typically ranging from one to five years. Residential garage door openers generally have a longer coverage period compared to commercial models. Proper installation and maintenance are required to maintain warranty validity. For detailed terms and conditions, refer to the warranty section in your owner’s manual or visit the Wayne Dalton website.

Contacting Wayne Dalton Customer Service

For assistance with your Wayne Dalton garage door opener, contact their customer service team. Visit their official website to find support options, including FAQs, manuals, and contact forms. You can also call their toll-free number or email for technical support. Ensure to have your product model and serial number ready for quicker service. Wayne Dalton is committed to providing timely and effective solutions to ensure your garage door opener operates optimally.

Final Tips for Optimal Performance

  • Regularly inspect and tighten all hardware to ensure stability.
  • Check the door balance to prevent strain on the opener.
  • Ensure the opener’s rail is properly aligned with the door.
  • Test the emergency release mechanism periodically.
  • Monitor battery levels in remotes and keyless entry systems.
  • Keep the garage door and opener clean from debris.
  • Consider upgrading to smart technology for enhanced control.

colorado commercial driver’s manual

The Colorado Commercial Drivers Manual provides essential information for obtaining a CDL, covering Class A, B, and C licenses. It guides applicants through eligibility, testing, and safe driving practices.

1.1 Purpose and Importance of the Manual

The Colorado Commercial Drivers Manual is designed to guide CDL applicants through the process of obtaining and maintaining a commercial driver’s license. It provides detailed information on safety regulations, driving laws, and driver responsibilities. The manual covers Class A, B, and C licenses, ensuring drivers understand traffic rules, safe operating practices, and legal requirements. Its purpose is to help drivers prepare for tests, operate safely, and comply with state and federal regulations, reducing accidents and enhancing road safety.

1.2 Overview of the Colorado CDL Program

The Colorado CDL Program is structured to ensure commercial drivers meet strict safety and qualification standards. It outlines the process for obtaining Class A, B, and C licenses, including written and skills tests. The program emphasizes safe driving practices, medical fitness, and legal compliance. It also covers eligibility criteria, such as age, medical certification, and vision requirements, to maintain highway safety.

Eligibility Requirements for a Colorado CDL

The Colorado CDL requires applicants to meet specific criteria, including age, medical fitness, and vision standards, ensuring safe and qualified commercial drivers.

2.1 Age Requirements

In Colorado, applicants for a CDL must be at least 21 years old to apply for an interstate CDL. For intrastate operations, the minimum age is 18 years old. Drivers under 21 must be accompanied by a qualified co-driver or instructor when operating a commercial vehicle with a permit.

2.2 Medical Certification

All CDL applicants in Colorado must meet federal medical standards and pass a DOT physical exam by an FMCSA-certified medical examiner. The exam evaluates blood pressure, vision, hearing, and physical condition to ensure drivers can safely operate a commercial vehicle. Applicants must carry a valid Medical Examiner’s Certificate and submit it with their CDL application. Failure to meet these standards can result in disqualification from obtaining a CDL.

2.3 Vision Standards

Colorado requires CDL applicants to meet specific vision standards to ensure safe driving. Applicants must have at least 20/40 vision acuity in each eye with or without corrective lenses and a 70-degree peripheral vision range. Drivers with vision impairments may be eligible for exemptions if they can demonstrate the ability to operate a commercial vehicle safely. A DOT physical exam is mandatory to verify these standards.

Types of Commercial Driver Licenses (CDLs) in Colorado

Colorado offers Class A, Class B, and Class C CDLs, each tailored to specific vehicle types and cargo requirements. Choosing the right license depends on the commercial driving career path.

3.1 Class A CDL

A Class A CDL in Colorado is required to operate combination vehicles with a GVWR of 26,001 pounds or more, where the trailer weighs over 10,001 pounds. This includes semi-trucks, tractor-trailers, and other large commercial vehicles. It is essential for drivers aiming to operate heavy commercial trucks.

3.2 Class B CDL

A Class B CDL in Colorado is required to operate heavy straight trucks, such as dump trucks, delivery trucks, and buses, with a GVWR of 26,001 pounds or more. It does not include combination vehicles unless the trailer weighs 10,001 pounds or less. This license is ideal for drivers focusing on non-combination heavy commercial vehicles.

3.3 Class C CDL

A Class C CDL is required for operating small passenger vehicles or vehicles transporting hazardous materials. It applies to vehicles with a GVWR of less than 26,001 pounds but designed to transport 16 or more passengers, including the driver. This license is ideal for drivers focusing on smaller commercial vehicles, such as buses or HazMat transportation, and may require specific endorsements.

Steps to Obtain a Colorado CDL

To obtain a Colorado CDL, applicants must apply for an instruction permit, pass written knowledge tests, complete skills tests, and meet all eligibility requirements.

4.1 Applying for a CDL Instruction Permit

To apply for a CDL instruction permit in Colorado, submit required documents, pass a vision test, and complete written knowledge exams. Applicants must be at least 21 years old and provide proof of residency and identity. The permit allows practice driving under the supervision of a licensed CDL holder aged 21 or older.

4.2 Passing the Written Knowledge Tests

Passing the written knowledge tests is a critical step in obtaining a Colorado CDL. The tests cover essential topics such as traffic laws, safe driving practices, and cargo handling. Applicants must study the Colorado Commercial Drivers Manual and complete practice tests to ensure readiness. The specific tests required depend on the CDL class and endorsements being sought. A passing score is mandatory to proceed.

4.3 Completing the Skills Tests

Completing the skills tests is the final step to obtain a Colorado CDL. The tests assess vehicle inspection, basic control, and on-road driving abilities. Applicants must demonstrate proficiency in pre-trip inspections, maneuvering, and safe driving techniques. The tests are conducted by certified CDL examiners and require precise skills such as shifting gears, backing, and stopping safely. Passing all components is mandatory for licensure.

Safe Driving Practices for Commercial Vehicles

Safe driving practices are crucial for commercial vehicles, emphasizing adherence to traffic laws, maintaining safe distances, and being vigilant to prevent accidents and ensure public safety.

5.1 Defensive Driving Techniques

Defensive driving techniques are vital for commercial drivers, emphasizing anticipation of potential hazards, maintaining safe following distances, and being prepared to react to unexpected situations. These methods help reduce risks and enhance overall road safety, ensuring the well-being of both the driver and other road users; Proper training and continuous practice are essential.

5.2 Speed Management

Speed management is crucial for commercial drivers, as it directly impacts safety and compliance. Drivers must adjust their speed according to road conditions, weather, and traffic flow. Maintaining a safe following distance and adhering to posted speed limits are essential. Proper speed management helps prevent accidents and ensures compliance with traffic laws, promoting a safer environment for all road users.

5.3 Night Driving Safety

Night driving requires heightened vigilance due to reduced visibility and potential driver fatigue. Commercial drivers should reduce speed, use high beams when safe, and avoid distractions. Regularly checking vehicle lights and mirrors is crucial. Allowing extra following distance and being cautious of pedestrians and wildlife can minimize risks. Proper preparation and rest before driving at night help ensure safety on the road.

Medical Certification for Commercial Drivers

Medical certification ensures commercial drivers meet FMCSA health standards. Drivers must submit a valid Medical Examiner’s Certificate to maintain CDL eligibility, adhering to strict guidelines for safety.

6.1 FMCSA Medical Standards

FMCSA medical standards ensure commercial drivers meet specific health criteria to operate safely. Requirements include passing vision, blood pressure, and diabetes screenings, with certain disqualifying conditions. Drivers must be certified by an FMCSA-approved medical examiner to maintain eligibility, ensuring public safety and adherence to federal regulations.

6.2 How to Submit Medical Certification

To submit medical certification in Colorado, drivers must provide a completed Medical Examiner’s Certificate to the DMV. This can be done online, by mail, or in person. The certification must be issued by an FMCSA-approved medical examiner and uploaded through the CDL Information System (CDLIS). Timely submission ensures compliance and maintains CDL eligibility.

Colorado CDL Testing System

The Colorado CDL Testing System includes written and skills tests. The manual is a key resource for preparation, ensuring drivers are well-equipped for both knowledge and practical assessments.

7.1 Written Knowledge Test Topics

The Colorado CDL written knowledge test covers essential topics such as road signs, traffic laws, safe driving practices, and specific endorsements. Applicants must demonstrate understanding of vehicle safety, cargo handling, and emergency procedures. The test is based on the Colorado Commercial Drivers Manual, ensuring applicants are well-prepared for the challenges of commercial driving.

7.2 Skills Test Components

The Colorado CDL skills test evaluates applicants’ ability to operate a commercial vehicle safely. It includes a pre-trip inspection to check vehicle safety, a basic vehicle control test to demonstrate maneuvering skills, and an on-road driving test to assess ability to navigate traffic, follow rules, and maintain control in various conditions.

DUI Laws and Penalties for Commercial Drivers

Colorado enforces strict DUI laws for commercial drivers; Penalties include license suspension and hefty fines, significantly impacting a driver’s career and CDL status.

8.1 Blood Alcohol Content (BAC) Limits

In Colorado, commercial drivers face stricter blood alcohol content (BAC) limits, set at 0.04%, compared to the 0.08% standard for non-commercial drivers. Exceeding this limit results in severe penalties, including CDL disqualification, significant fines, and potential job loss, emphasizing the importance of adhering to these regulations to maintain professional driving privileges.

8.2 Consequences of a DUI Conviction

A DUI conviction for commercial drivers in Colorado results in severe penalties, including CDL disqualification for at least one year, or three years if transporting hazardous materials. Repeat offenses can lead to permanent disqualification. Additionally, a DUI conviction may result in significant fines, increased insurance costs, and potential job loss, underscoring the importance of adhering to strict alcohol-related driving laws for commercial drivers.

Commercial Driver License Endorsements

Colorado CDL endorsements certify drivers for specialized operations, such as hazardous materials, tank vehicles, and doubles/triples trailers, ensuring they meet specific safety and operational standards.

9.1 Hazardous Materials (H) Endorsement

The Hazardous Materials (H) Endorsement allows Colorado CDL holders to transport hazardous materials. It requires a background check by the Transportation Security Administration (TSA) and passing a written test on handling and safety protocols for hazardous substances, ensuring compliance with federal and state regulations to protect public safety and the environment.

9.2 Tank Vehicle (N) Endorsement

The Tank Vehicle (N) Endorsement is required for Colorado CDL holders operating vehicles designed to transport liquids or gases in permanently attached tanks. It demands specialized knowledge of cargo handling, safety protocols, and emergency procedures. Applicants must pass a written test covering these topics and hold a valid CDL to qualify for this endorsement, ensuring safe transportation of hazardous liquids or gases.

9.3 Doubles/Triples (T) Endorsement

The Doubles/Triples (T) Endorsement allows Colorado CDL holders to operate vehicles towing two or three trailers; It requires advanced skills in handling longer combinations and passing a specialized test. This endorsement ensures drivers can safely manage the unique challenges of multi-trailer operations, enhancing road safety and operational efficiency for transportation companies hauling large or oversized loads.

Disqualifications and Suspensions

Disqualifications and suspensions of a Colorado CDL occur due to serious traffic offenses, such as DUI or reckless driving, violating federal regulations, leading to loss of CDL privileges.

10.1 Violations Leading to Disqualification

Violations leading to CDL disqualification include DUI convictions, excessive blood alcohol content (BAC), reckless driving, speeding, and causing accidents. These offenses result in temporary or permanent loss of commercial driving privileges, depending on severity and recurrence, as outlined in Colorado’s strict regulations to ensure road safety and accountability among commercial drivers.

10.2 reinstating a Suspended CDL

10.2 Reinstating a Suspended CDL

Reinstating a suspended CDL in Colorado involves completing the suspension period, paying required fees, and meeting specific requirements, such as retaking the CDL tests or completing a driver improvement course. Drivers must ensure all violations are resolved and comply with state regulations before their commercial driving privileges can be restored. Details are available on the Colorado DMV website.

Additional Resources for CDL Applicants

The Colorado DMV offers free CDL study guides, practice tests, and a comprehensive handbook to help applicants prepare for their exams and understand requirements.

11.1 Free CDL Study Guides

Colorado provides free CDL study guides to help applicants prepare for written and skills tests. These guides cover essential topics such as traffic laws, safe driving practices, and vehicle inspection procedures. They are available online and can be downloaded for convenient study. Using these resources ensures applicants are well-prepared for the CDL exams.

11.2 CDL Practice Tests

Free CDL practice tests are available online to help applicants assess their knowledge and prepare for the written exams. These tests cover various topics, such as traffic laws, safety regulations, and vehicle inspection procedures. Regular practice helps identify weak areas and improves overall readiness for the actual CDL tests, ensuring a higher likelihood of success.

great dane chariot 61 parts manual

The Great Dane Chariot 61 parts manual is a comprehensive guide for understanding and maintaining your Chariot Sr. riding lawn mower.

It provides detailed specifications, diagrams, and troubleshooting tips, ensuring optimal performance and longevity of your equipment.

1.1 Overview of the Manual

The Great Dane Chariot 61 parts manual is a detailed resource designed to help users understand and maintain their Chariot Sr. riding lawn mower effectively. It covers essential components, including engines, cutting decks, and hydraulic systems, providing specifications and diagrams for clarity. The manual is structured to guide homeowners and professionals through routine maintenance, troubleshooting, and repairs. Key sections include parts catalogs, safety precautions, and operational guidelines. By following the manual, users can ensure their mower operates at peak performance while extending its lifespan. This comprehensive guide is indispensable for anyone seeking to keep their Great Dane Chariot 61 in optimal condition.

1.2 Importance of the Manual for Maintenance and Repair

The Great Dane Chariot 61 parts manual is an essential tool for maintaining and repairing your lawn mower. It provides detailed diagrams, part lists, and troubleshooting guides, enabling users to identify and resolve issues efficiently. Regular maintenance, as outlined in the manual, helps prevent costly repairs and ensures optimal performance. By following the manual’s instructions, users can replace worn or damaged parts correctly, reducing the risk of further damage. Additionally, the manual emphasizes safety protocols, ensuring that repairs are conducted safely and effectively. This resource is invaluable for both professionals and homeowners, helping to extend the lifespan of the Chariot 61 and maintain its reliability over time.

Parts Catalog for Chariot Sr. Riding Lawn Mowers

The Chariot Sr. parts catalog covers models with Kohler or Kawasaki engines and 52 or 61-inch cutting decks, listing over 60 components with diagrams for clarity.

2.1 Engines and Cutting Decks Specifications

The Great Dane Chariot 61 parts manual details engines from Kohler and Kawasaki, offering 25hp options for robust performance. Cutting decks are available in 52 or 61 inches, ensuring precise mowing. The manual specifies engine serial numbers and deck compatibility, aiding in accurate part identification. Models like GCHKW2561S feature a 25hp Kawasaki engine, paired with a 61-inch deck for efficient cutting. Hydrostatic transmissions and blade-engagement systems are highlighted for smooth operation. This section ensures users understand their mower’s power and cutting capabilities, enabling proper maintenance and repair. Specifications are clearly outlined to help users match parts with their equipment, ensuring optimal functionality and longevity.

2.2 List of Parts and Components

The Great Dane Chariot 61 parts manual provides a detailed list of components, including engine parts, cutting deck assemblies, and hydraulic systems. Key components like mower deck drive belts, spindle drive belts, and mower blades are highlighted for easy identification. The manual also lists frame parts, tie bars, and bolts, ensuring users can locate and replace worn or damaged items. Additionally, it includes motion control systems, such as pumps and valves, essential for the mower’s operation. Each part is cataloged with reference numbers, allowing users to quickly find what they need. This comprehensive list ensures that every aspect of the mower is covered, making maintenance and repairs more efficient and precise. Accurate part identification is crucial for optimal performance.

2.3 Diagrams and Illustrations

The Great Dane Chariot 61 parts manual includes detailed diagrams and illustrations to help users understand the assembly and disassembly of components. These visuals provide a clear overview of the mower’s structure, highlighting key systems like the cutting deck, engine, and hydraulic controls. Exploded views of major assemblies, such as the mower deck and spindle housing, simplify part identification and troubleshooting. The diagrams also illustrate the proper alignment and installation of parts, ensuring repairs are done correctly. These visual aids are essential for diagnosing issues and guiding maintenance tasks, making the manual an invaluable resource for both novice and experienced users. The illustrations complement the text, offering a comprehensive understanding of the mower’s inner workings.

Troubleshooting Common Issues

The manual provides diagnostic guides for common issues like engine problems, cutting deck malfunctions, and hydraulic system failures, offering repair tips for quick resolution.

3.1 Identifying Common Problems

The Great Dane Chariot 61 parts manual helps users identify common issues such as engine difficulties, cutting deck malfunctions, and hydraulic system leaks.

Typical problems include unusual noises, vibrations, or failure to start, often linked to worn or damaged parts like belts, blades, or pulleys.

The manual provides diagnostic charts and inspection checklists to help pinpoint issues accurately, ensuring timely repairs and preventing further damage to the mower.

By addressing symptoms like uneven cutting or loss of power, users can troubleshoot effectively and maintain their equipment’s performance and longevity.

3.2 Repair and Maintenance Tips

The Great Dane Chariot 61 parts manual offers practical tips for repairing and maintaining your lawn mower, ensuring optimal performance and longevity.

Regularly inspect and replace worn parts like drive belts, mower blades, and hydraulic components to prevent breakdowns and maintain cutting efficiency.

Always use genuine Great Dane replacement parts to guarantee compatibility and durability, and consult the manual’s diagrams for accurate repairs.

Keep the mower deck clean, check oil levels frequently, and sharpen blades regularly to ensure even cutting and reduce wear on the engine and transmission.

For complex issues, refer to the troubleshooting section or contact a certified Great Dane dealer for professional assistance and genuine parts.

By following these tips, you can extend the life of your Chariot 61 and keep it running smoothly for years to come.

Replacement Parts and Accessories

The Great Dane Chariot 61 parts manual provides a detailed list of replacement parts and accessories, ensuring easy identification and ordering for optimal mower performance and longevity.

4.1 Identifying the Correct Parts

Identifying the correct parts for your Great Dane Chariot 61 mower is essential for efficient repairs and maintenance. The parts manual provides a detailed list of components, including part numbers, descriptions, and diagrams, to help you accurately identify what you need. Each part is categorized by its function, such as engine components, cutting deck parts, or hydraulic systems. The manual also includes reference numbers and quantities to ensure you order the right amount. By cross-referencing your mower’s model and serial number with the catalog, you can pinpoint the exact parts required. This section emphasizes the importance of using genuine Great Dane replacement parts to maintain performance and longevity.

4.2 Ordering Replacement Parts

Ordering replacement parts for your Great Dane Chariot 61 mower requires precise information to ensure accuracy. Start by gathering your mower’s model and serial number, as well as the engine serial number, which are typically found in the manual or on the unit. Use the parts catalog to identify the correct part numbers for your specific model. Contact an authorized Great Dane dealer with this information to place your order. Dealers often require these details to verify compatibility and expedite the process. Always purchase genuine Great Dane parts to maintain performance and avoid potential compatibility issues. Double-check the part numbers and quantities before finalizing your order to ensure everything is correct and complete.

4.3 Installation Guidelines

Installation of replacement parts on your Great Dane Chariot 61 mower should be done with care to ensure proper function and safety. Always consult the manual or diagrams provided with the parts for specific instructions. Use genuine Great Dane replacement parts to avoid compatibility issues. Before starting, disconnect the battery to prevent accidental startups. Wear protective gear, such as gloves and safety glasses, to minimize risks. Follow step-by-step instructions in the manual, and ensure all bolts and components are tightened to the recommended torque specifications. For complex installations, consider consulting a professional mechanic. After installation, test the mower to ensure everything operates smoothly. Properly dispose of old or damaged parts to maintain environmental safety.

Safety Instructions and Precautions

Always wear protective gear, ensure the mower is on a level surface, and keep loose clothing tied back. Disconnect power before performing maintenance tasks.

5.1 General Safety Guidelines

Always read the manual thoroughly before operating the Great Dane Chariot 61 mower to understand safety protocols. Wear protective gear, including gloves and eye protection. Ensure children and pets are kept at a safe distance. Never operate the mower on uneven terrain or near slopes. Keep the mower deck clear of debris and ensure all guards are in place. Avoid wearing loose clothing that could get caught in moving parts. Maintain a firm grip on the controls and stay alert while mowing. Follow all safety decals and warnings provided on the equipment. Properly shut off the engine and allow it to cool before performing maintenance tasks. Adhere to these guidelines to ensure safe and efficient operation of your mower.

5.2 Operating and Maintenance Safety

Always follow proper operating and maintenance procedures to ensure safety and longevity of your Great Dane Chariot 61 mower. Before starting, inspect the mower deck, belts, and blades for damage or wear. Ensure all protective guards are securely in place. Avoid mowing in reverse unless necessary, and use the reverse mowing feature only with the ROPS (Roll-Over Protective Structure) in place. Keep the mower deck at the recommended height to maintain stability. Never leave the mower unattended while it is running. Regularly check and maintain proper tire pressure and hydraulic fluid levels. Use only genuine Great Dane replacement parts for repairs. Always disconnect the spark plug wire before performing maintenance tasks. Follow these guidelines to ensure safe operation and prevent potential hazards.

marc loudon organic chemistry 7th edition solutions manual pdf

Marc Loudon’s Organic Chemistry 7th Edition Solutions Manual provides detailed solutions to textbook problems, enhancing understanding of organic chemistry concepts. It includes updated content, improved problem sets, and contributions from Jim Parise, offering students a comprehensive resource for academic success. Available in PDF and print formats, it can be purchased or rented via Amazon, CampusBooks, and other platforms.

Overview of the Solutions Manual

The 7th Edition Solutions Manual for Marc Loudon’s Organic Chemistry is a comprehensive resource designed to accompany the main textbook. It provides detailed solutions to end-of-chapter problems, offering clarity and precision. The manual is updated to align with the latest edition of the textbook, ensuring relevance and accuracy. It features a wide range of problems, from basic to advanced, catering to diverse learning needs. Additionally, the manual includes contributions from Jim Parise and other experts, enhancing its depth and educational value. Students can access it in print or digital formats, including PDF, through platforms like Amazon and CampusBooks.

Importance of the Solutions Manual for Students

The 7th Edition Solutions Manual is an indispensable tool for students studying organic chemistry. It provides clear, step-by-step solutions to textbook problems, helping students understand complex concepts and improve problem-solving skills. The manual enables learners to identify gaps in their knowledge and reinforces key ideas through practical application. Additionally, it serves as a valuable resource for exam preparation, offering insights into common question types and challenging topics. By using the solutions manual, students can enhance their understanding and confidence, ultimately achieving better academic outcomes in their organic chemistry coursework.

Key Features of the 7th Edition Solutions Manual

The 7th Edition Solutions Manual features updated content, improved problem sets, and enhanced clarity. It includes detailed explanations and collaborative contributions from Marc Loudon and Jim Parise.

Updated Content and Revisions

The 7th Edition Solutions Manual includes revised and updated content to align with the latest developments in organic chemistry. Marc Loudon and Jim Parise collaborated to refine explanations, ensuring clarity and accuracy. New problem sets reflect current trends, challenging students to apply concepts effectively. The manual addresses student feedback, offering improved step-by-step solutions for complex reactions and mechanisms. This edition emphasizes critical thinking, providing detailed annotations to help students grasp fundamental principles. The revisions make the manual indispensable for mastering organic chemistry, catering to both undergraduate and graduate-level learners.

Improved Problem Sets and Exercises

The 7th Edition Solutions Manual features enhanced problem sets designed to challenge students and deepen their understanding of organic chemistry. These exercises cover a wide range of topics, from basic mechanisms to advanced synthesis strategies. Each problem is accompanied by detailed, step-by-step solutions, allowing students to track their progress and identify areas for improvement. The manual also includes new types of exercises, such as mechanism-based questions and stereochemistry challenges, ensuring comprehensive practice. This structured approach helps students build problem-solving skills and confidence in tackling complex organic chemistry problems effectively.

Contributors and Authors

Marc Loudon is the primary author, with significant contributions from Jim Parise, Joseph G. Stowell, and Lisa Bonner, ensuring a collaborative and expert approach to the manual.

Role of Marc Loudon

Marc Loudon, a renowned expert in organic chemistry, is the primary author of the 7th Edition Solutions Manual. His clear and concise explanations, combined with creative problem sets, have made the manual indispensable for students. Loudon’s expertise ensures accuracy and depth in solving complex organic chemistry problems, aligning perfectly with the textbook. His approach encourages critical thinking and conceptual understanding, making the manual a trusted resource for academic success. Loudon’s contributions have significantly impacted the field, providing students with a reliable guide to mastering organic chemistry concepts.

Contributions of Jim Parise and Other Authors

Jim Parise, alongside Marc Loudon, has significantly contributed to the 7th Edition Solutions Manual. His expertise enhances the manual’s clarity and relevance, ensuring problems align with modern organic chemistry curriculum. Additional authors, including Lisa Bonner, bring diverse perspectives, enriching the content. Their collaborative efforts result in a comprehensive resource that aids students in understanding complex concepts. Parise’s and other authors’ contributions reflect their commitment to educational excellence, making the manual an essential tool for achieving academic success in organic chemistry.

Availability and Purchase Options

The 7th Edition Solutions Manual is available for purchase or rent on platforms like Amazon, CampusBooks, and Direct Textbook. ISBN 9781319363772 helps locate it easily.

Where to Buy the Solutions Manual

The 7th Edition Solutions Manual is widely available through major retailers like Amazon, Barnes & Noble, and CampusBooks. Online platforms such as Direct Textbook and Chegg also offer it for purchase or rent. Students can search using the ISBN (9781319363772) to find the manual on these websites. Additionally, some sellers on Amazon and eBay provide new and used copies, catering to different budgets. The manual can also be found through university bookstores or by using comparison tools to find the best price. This ensures accessibility for students seeking to enhance their organic chemistry studies.

Rent vs. Buy: Cost-Effective Options

Students can choose between renting or buying Marc Loudon’s 7th Edition Solutions Manual, depending on their needs and budget. Renting is a cost-effective option for short-term access, often saving up to 50% compared to buying. Platforms like Amazon, Chegg, and CampusBooks offer rental options with flexible durations. Buying, however, provides long-term access, ideal for repeated use or reference. Tools like CampusBooks’ Buy vs. Rent calculator help students decide based on cost and duration. Both options ensure accessibility, allowing students to manage expenses while benefiting from the manual’s educational value.

Digital Access and Resources

The 7th Edition Solutions Manual is available in PDF format, accessible via platforms like Amazon, Scribd, and Internet Archive. Legal purchase ensures uninterrupted study support.

PDF Availability and Legal Considerations

The 7th Edition Solutions Manual is available as a PDF, accessible through platforms like Amazon, Scribd, and the Internet Archive. Purchasing from authorized sources ensures legality. ISBN 9781319363772 guarantees authenticity. Contributors include Jim Parise and Lisa Bonner, enhancing the manual’s credibility. Downloading from unauthorized sites risks legal consequences and deprives authors of fair compensation. Always opt for legal purchases to support creators and access the most updated content. This ensures uninterrupted study support while adhering to copyright laws. Legal access is essential for both academic integrity and respecting intellectual property rights.

Online Platforms for Accessing the Manual

The 7th Edition Solutions Manual can be accessed through various online platforms, including Amazon, Direct Textbook, and CampusBooks. These platforms offer options to buy, rent, or download the manual in PDF format. The ISBN 9781319363772 ensures easy identification of the correct edition. Many sites provide a “Buy vs. Rent” tool to help students make cost-effective decisions. Additionally, platforms like Scribd and the Internet Archive may offer digital access, though purchasing directly from authorized sellers is recommended for authenticity and legality. Online availability ensures convenient access for students worldwide.

Community Discussions and Reviews

Online forums like Reddit discuss the 7th Edition Solutions Manual, with students sharing resources and debating its value. Reviews highlight its clarity and problem-solving assistance.

Reddit and Forum Conversations

Online discussions on platforms like Reddit highlight the value of Marc Loudon’s 7th Edition Solutions Manual. Students often share PDF requests and debate its cost-effectiveness. Threads in subreddits such as r/udub and r/Scholar reveal a mix of appreciation for its detailed solutions and frustration over the high price. Some users advocate for renting or borrowing, while others emphasize its importance for mastering organic chemistry concepts. These conversations underscore the manual’s reputation as a vital resource, despite accessibility concerns, making it a frequently discussed topic among chemistry students seeking academic support.

Student Feedback and Recommendations

Students widely appreciate the 7th Edition Solutions Manual for its clear explanations and detailed solutions, which aid in understanding complex organic chemistry concepts. Many recommend it for its updated content and relevance to the latest textbook edition. However, some students express concerns about the cost, suggesting that renting or buying earlier editions could be more affordable. Overall, the manual is highly recommended for its ability to enhance problem-solving skills and deepen understanding of key topics. Students consistently highlight its value as an essential study resource for achieving academic success in organic chemistry courses.

This manual is an excellent resource for understanding organic chemistry through detailed solutions and comprehensive coverage, aiding students in mastering key concepts and problem-solving skills effectively.

Final Thoughts on the Solutions Manual

Marc Loudon’s Organic Chemistry 7th Edition Solutions Manual is a invaluable study aid, offering clear explanations and detailed solutions to complex problems. It complements the main textbook by reinforcing key concepts and encouraging critical thinking. The collaborative efforts of Marc Loudon, Jim Parise, and other contributors ensure accuracy and relevance. Students seeking to master organic chemistry will find this manual indispensable for exam preparation and self-study. Its availability in both digital and print formats makes it accessible to all learners. Investing in this resource is a wise decision for academic success.

Encouragement to Use the Manual for Academic Success

Marc Loudon’s Organic Chemistry 7th Edition Solutions Manual is an essential resource for achieving academic success in organic chemistry. It provides detailed solutions to complex problems, helping students grasp key concepts and improve problem-solving skills. Regular use of the manual enhances understanding, boosts confidence, and prepares students for exams. Its clarity and accuracy make it a valuable tool for self-study and review. By leveraging this manual, students can master organic chemistry and excel in their coursework. Consistent use is highly recommended for optimal learning outcomes and long-term retention of material.

canon a 1 manual

The Canon A-1, introduced in 1978, is a legendary 35mm film SLR camera designed for professionals and hobbyists alike. This manual guides users through its advanced features, ensuring optimal performance and creative control, making it an essential resource for mastering the camera’s capabilities.

1.1 Overview of the Canon A-1 Camera

The Canon A-1, introduced in 1978, is a highly regarded 35mm film SLR camera known for its durability and advanced features. Designed for both professionals and enthusiasts, it offers aperture priority and manual modes, compatibility with Canon FD lenses, and a built-in metering system, making it a versatile and popular choice among photographers.

1.2 Importance of the Manual for Optimal Use

The Canon A-1 manual is essential for unlocking the camera’s full potential. It provides detailed guidance on mastering advanced features, troubleshooting common issues, and understanding best practices for film photography. By following the manual, users can optimize their shooting experience, ensuring precise control over exposure, focus, and creative techniques, making it indispensable for both beginners and experienced photographers.

Key Features of the Canon A-1

The Canon A-1 boasts an advanced built-in metering system, aperture priority, and manual modes, offering precise control. Its compatibility with Canon FD lenses enhances versatility for various photography needs.

2.1 Built-in Metering System

The Canon A-1 features a sophisticated built-in metering system, providing accurate light measurements for optimal exposures. It supports both aperture priority and manual modes, ensuring precise control over lighting conditions. This system is essential for achieving professional-quality results, making it a standout feature for photographers seeking reliability and creative flexibility.

2.2 Aperture Priority and Manual Modes

The Canon A-1 offers Aperture Priority and Manual modes, catering to both automatic and manual shooting preferences. In Aperture Priority, users set the aperture, and the camera adjusts the shutter speed. Manual mode allows full control over both aperture and shutter speed, enabling precise artistic expression and technical accuracy, ideal for experienced photographers seeking creative freedom.

2.3 Compatibility with Canon FD Lenses

The Canon A-1 is compatible with a wide range of Canon FD lenses, offering exceptional optical quality and versatility. From wide-angle to telephoto and macro lenses, the FD series provides photographers with numerous creative options. This compatibility ensures the A-1 can adapt to various shooting scenarios, making it a reliable choice for diverse photography needs and preferences.

Getting Started with the Canon A-1

Welcome to the Canon A-1! This section guides you through unboxing, initial setup, and understanding basic camera controls to ensure a smooth start with your photography journey.

3.1 Unboxing and Initial Setup

Unboxing your Canon A-1 is an exciting experience. Carefully inspect the camera for any damage or defects. Attach the lens, ensuring it clicks securely into place. Familiarize yourself with the camera’s layout, including the shutter dial, aperture ring, and metering switch. Before use, load film and install the batteries. These steps ensure your camera is ready for optimal performance.

3.2 Basic Camera Controls and Functions

The Canon A-1 features intuitive controls for seamless operation. The shutter speed dial sets exposure time, while the aperture ring adjusts lens opening. The metering switch toggles between ambient and flash modes. The film advance lever moves to the next frame, and the self-timer ensures hands-free shooting. Familiarizing yourself with these controls enhances your shooting experience and ensures precise results.

Loading Film in the Canon A-1

Load film by opening the camera back, aligning the film cartridge, and advancing the film to the take-up spool. Ensure the film is properly seated and threaded through the sprocket teeth for accurate frame spacing. Always handle film in low-light conditions to prevent exposure.

4.1 Step-by-Step Film Loading Process

Open the camera back by pulling the release latch. Insert the film cartridge, aligning it with the spool; Gently pull the film leader to the take-up spool, ensuring it fits securely. Advance the film by turning the rapid rewind knob until it stops. Close the back, then wind the film to the first frame. Check the frame counter to confirm loading.

4.2 Tips for Proper Film Handling

  • Always store film in a cool, dry place to prevent degradation.
  • Avoid exposing film to direct sunlight to minimize fogging.
  • Handle film gently, avoiding contact with the emulsion side to prevent scratches.
  • Load film in low-light conditions to reduce exposure to light.
  • Use film before its expiration date for optimal quality.
  • Store unused film in its original packaging, ideally in the refrigerator.

Understanding the Exposure System

The Canon A-1’s exposure system balances aperture, shutter speed, and ISO, utilizing its built-in light meter to ensure precise control over lighting conditions for optimal image results.

5.1 Aperture, Shutter Speed, and ISO

Aperture regulates light entry, shutter speed controls exposure duration, and ISO sets film sensitivity. Balancing these elements ensures proper exposure. The Canon A-1’s built-in meter aids in precise adjustments, allowing users to achieve desired creative effects by manually or automatically controlling these settings for optimal results in various lighting conditions.

5.2 Using the Built-in Light Meter

The Canon A-1 features a built-in light meter for precise exposure calculation. It measures ambient light and provides accurate readings, allowing users to adjust aperture and shutter speed manually or automatically. The meter ensures optimal exposure in various lighting conditions, simplifying the process of capturing well-balanced images with minimal effort.

Lens System and Accessories

The Canon A-1 utilizes the FD mount, offering compatibility with a wide range of Canon FD lenses, from wide-angle to telephoto; Popular accessories include flashes and remote shutters for enhanced functionality.

6.1 Overview of Canon FD Lenses

Canon FD lenses are renowned for their exceptional optical quality and versatility. Available in a wide range of focal lengths, from wide-angle to telephoto, these lenses offer manual focusing and aperture control. Designed for the FD mount, they seamlessly integrate with the Canon A-1, providing precise control and compatibility for both professional and enthusiast photographers.

6.2 Recommended Accessories for the Canon A-1

Essential accessories for the Canon A-1 include high-quality lens cleaning kits to maintain optical clarity, a remote shutter release for minimizing camera shake, and a durable camera strap for secure handling. Additional items like a lens hood and filters enhance functionality, while a sturdy camera bag protects the equipment during transport, ensuring longevity and optimal performance of the camera and its lenses.

Maintenance and Care

Regular maintenance ensures the Canon A-1’s longevity. Clean the camera and lenses with a soft cloth and avoid harsh chemicals. Store the camera in a dry, cool place to prevent damage and extend its lifespan.

7.1 Cleaning the Camera and Lenses

Regular cleaning is essential for maintaining the Canon A-1’s performance. Use a soft, dry cloth to wipe the camera body and avoid harsh chemicals. For lenses, gently remove dust with a microfiber cloth or a lens brush. Avoid touching the lens surface to prevent smudges. Proper cleaning ensures clear images and prolongs the camera’s lifespan.

7.2 Regular Maintenance Tips

Regular maintenance ensures the Canon A-1 operates smoothly. Check and clean the mirror and viewfinder periodically. Lubricate moving parts if necessary, but avoid over-lubrication. Store the camera in a cool, dry place to prevent moisture damage. Replace the battery every five years to avoid corrosion. Proper care extends the camera’s functionality and ensures reliable performance for years to come.

Advanced Techniques

The Canon A-1 offers advanced techniques like manual mode, aperture priority, and creative exposure control, enabling precise and artistic photography for professional results.

8.1 Using Manual Mode Effectively

Manual mode on the Canon A-1 offers full control over aperture and shutter speed, enabling precise adjustments for creative photography. Use the built-in light meter to guide settings, ensuring optimal exposure in various lighting conditions. This mode is ideal for experienced photographers seeking to experiment with artistic techniques and achieve desired visual effects in their work.

8.2 Creative Photography with the Canon A-1

The Canon A-1 excels in creative photography, offering precise control over aperture and shutter speed to capture unique effects. Experiment with depth of field, motion blur, and low-light scenarios using its manual capabilities. Pair it with Canon FD lenses for stunning results, from portraits to landscapes. Its portability and reliability make it ideal for photographers seeking to push creative boundaries and explore artistic expression.

Troubleshooting Common Issues

The Canon A-1 may experience issues like shutter malfunctions or metering inaccuracies. Regular cleaning, recalibrating, and consulting the manual can often resolve these problems effectively.

9.1 Resolving Shutter and Metering Problems

Shutter issues may arise from dirt or worn curtains. Clean gently with a soft brush. Metering problems often result from incorrect settings or low battery. Ensure proper battery installation and check aperture/shutter speed alignment. If problems persist, recalibrate the metering system or consult a professional technician for precise adjustments to restore functionality. Always refer to the manual for detailed troubleshooting steps.

9.2 Addressing Film Loading and Advancement Issues

Film loading issues often occur due to improper alignment or failure to secure the film properly. Ensure the film is correctly seated on the spool and advanced to the first frame. If the film doesn’t advance, check for obstructions or dirty rollers. Partially exposed rolls can be rewound using the rewind knob. Always refer to the manual for detailed film handling procedures to avoid damage.

craftsman lt1500 manual

Welcome to the Craftsman LT1500 Manual, your essential guide for operating and maintaining the LT1500 riding lawn mower. This manual provides detailed instructions, safety guidelines, and troubleshooting tips to ensure optimal performance. Download the PDF version from Sears Parts Direct for free and explore sections on safety, maintenance, and warranty details to get the most out of your equipment.

1.1 Overview of the LT1500 Model

The Craftsman LT1500 is a reliable riding lawn mower designed for efficient cutting and durability. Featuring a 17.5 HP engine and a 42-inch mowing deck, it offers precise cutting and easy maneuverability. With an electric start and 6-speed transaxle, it provides smooth operation. This model is ideal for medium-sized lawns, combining power and comfort. The manual details its features, operation, and maintenance to ensure optimal performance and longevity of the equipment. It is a popular choice for homeowners seeking a balance between power and affordability.

1.2 Importance of Reading the Manual

Reading the Craftsman LT1500 manual is crucial for safe and effective operation. It provides essential safety guidelines, operating instructions, and maintenance tips to prevent accidents and ensure longevity. The manual outlines proper techniques for starting, driving, and mowing, as well as troubleshooting common issues. Understanding the content helps users maximize performance and avoid costly repairs. Failure to follow the manual may void the warranty or lead to equipment damage. Always refer to the guide before operating the mower for the first time or performing maintenance tasks.

Safety Precautions and Rules

Adhering to safety rules is essential. Always read the manual, follow guidelines, wear protective gear, stay alert, and ensure the area is clear before operating.

2.1 General Safety Guidelines

Always read and understand the manual before operating. Wear protective gear like gloves and eyewear. Ensure the area is clear of obstacles and bystanders. Keep children and pets away. Avoid loose clothing that could get caught. Never operate under the influence of alcohol or drugs; Be cautious on slopes and uneven terrain. Follow all safety rules and instructions provided in the manual to ensure safe and effective operation of the Craftsman LT1500.

2.2 Operating Safety Tips

Always start the engine in a well-ventilated area and avoid sudden movements. Use the seatbelt when operating the tractor. Keep the PTO (Power Take-Off) disengaged until ready to mow. Never leave the tractor unattended while it’s running. Be aware of your surroundings and avoid obstacles. Maintain a safe distance from bystanders and pets. Use caution when reversing and ensure the mowing deck is lowered properly. Follow these tips to ensure safe and efficient operation of the Craftsman LT1500.

Understanding the LT1500 Tractor

The Craftsman LT1500 is a versatile riding lawn tractor designed for efficient mowing. It features a 17.5 HP engine, 42-inch mowing deck, and 6-speed transaxle for smooth operation. The electric start and ergonomic design enhance user comfort, while the durable construction ensures long-lasting performance. This section provides key insights into the tractor’s components and features to help you maximize its capabilities.

3.1 Key Features of the LT1500

The Craftsman LT1500 boasts a powerful 17.5 HP engine, a 42-inch mowing deck, and a 6-speed transaxle for smooth operation. It features an electric start system for easy ignition and an ergonomic design for comfort during long mowing sessions. The tractor is built with durable materials to withstand regular use and harsh weather conditions. Additional features include a sturdy steel frame, adjustable cutting heights, and a reliable transmission system, making it ideal for maintaining large lawns efficiently and effectively.

3.2 Controls and Components Overview

The LT1500 features a user-friendly control panel with an ignition switch, throttle lever, and steering wheel for easy maneuverability. The choke and gear selector are conveniently located for straightforward operation. The mowing deck controls, including the blade engagement lever and height adjustment, ensure precise cutting. Additional components include a reliable brake system, clutch, and dashboard indicators for monitoring vital functions. The 6-speed transaxle and electric start system enhance performance and convenience, making the LT1500 a versatile and efficient lawn tractor.

Operating the LT1500

Learn how to start the engine, drive, and maneuver the LT1500 safely. Follow proper mowing techniques and adjust settings for optimal performance. Always refer to safety guidelines for efficient and secure operation;

4.1 Starting the Engine

  1. Ensure the transmission is in neutral and the parking brake is engaged.
  2. Check that the PTO (Power Take Off) is disengaged and the mowing deck is raised.
  3. Verify the seat switch is functioning properly; the engine will not start if the operator is not seated.
  4. Insert the key into the ignition and turn it clockwise to the “Start” position.
  5. Allow the engine to warm up briefly before engaging the PTO or moving the tractor.

Refer to the manual for detailed steps and safety precautions to ensure a smooth startup.

4.2 Driving and Steering Techniques

Mastering the driving and steering techniques of your Craftsman LT1500 ensures safe and efficient mowing. Always maintain a firm grip on the steering wheel and keep your eyes on the path ahead. Use the foot pedals to control acceleration and braking smoothly. For turns, gradual steering is recommended to maintain stability. When mowing slopes, drive uphill with the mower deck engaged and avoid sharp turns. Practice in an open area to familiarize yourself with the tractor’s handling and response.

  1. Start on level ground to get accustomed to the controls.
  2. Use the brake pedal gently to avoid skidding.
  3. Shift gears according to terrain and load.
  4. Avoid sudden movements to maintain control.

4.3 Mowing and Cutting Procedures

For efficient mowing, start by adjusting the mowing height to suit the grass length. Engage the PTO (Power Take Off) slowly and maintain steady forward motion. Overlap passes slightly to ensure an even cut; Avoid mowing in the same pattern repeatedly to prevent soil compaction; For cleaner results, mow when the grass is dry and at the recommended height. Use the mulching feature for finer clippings or the bagger for collecting cut grass. Always clear debris from the mowing deck after use for optimal performance.

  • Adjust mowing height based on grass type and length.
  • Engage the PTO gradually to avoid sudden starts.
  • Maintain a steady pace for consistent cutting results.
  • Overlap passes to cover all areas evenly.
  • Clear debris from the mowing deck regularly.

Maintenance and Care

Regular maintenance ensures optimal performance. Lubricate moving parts, check tire pressure, and sharpen blades. Store the mower in a dry place during winter to prevent rust.

5.1 Regular Maintenance Schedule

Regular maintenance is crucial for the longevity and performance of your Craftsman LT1500. Schedule oil changes every 50 hours of operation and replace the air filter annually or as needed. Check tire pressure monthly and ensure proper inflation. Sharpen mower blades every 25 hours to maintain cutting efficiency. Clean the mower deck after each use to prevent debris buildup. Inspect and grease moving parts seasonally. Follow the recommended maintenance schedule in the manual to keep your tractor running smoothly and efficiently.

5.2 Lubrication and Tune-Up Instructions

Proper lubrication and tune-ups are essential for maintaining the performance of your Craftsman LT1500. Lubricate the front axle, mower deck, and transmission regularly. Change the engine oil every 50 hours and clean or replace the air filter as needed. Inspect and sharpen the mower blades for optimal cutting efficiency. Refer to the manual for specific lubrication points and tune-up procedures. Regular maintenance ensures smooth operation and extends the lifespan of your tractor, while also maintaining warranty coverage.

5.3 Storage and Winterization Tips

Proper storage and winterization are crucial for maintaining your Craftsman LT1500 tractor. Clean the tractor thoroughly, especially the mower deck and blades. Drain the fuel tank or use a fuel stabilizer to prevent degradation. Disconnect the battery and store it in a cool, dry place. Check the tire pressure and store the tractor in a dry, protected area to prevent rust and damage. Cover the tractor to protect against dust and pests. Regular maintenance during storage ensures your tractor is ready for the next season.

Troubleshooting Common Issues

This section helps identify and resolve common problems with the Craftsman LT1500, ensuring efficient operation. It covers engine, transmission, and mowing deck issues effectively.

6.1 Diagnosing Engine Problems

Diagnosing engine issues in your Craftsman LT1500 involves checking fuel, oil, and air systems. Ensure the fuel tank is full and the filter is clean. Check oil levels and condition. A faulty spark plug or clogged air filter can cause poor performance. If the engine won’t start, verify the ignition switch and battery connections. For rough running, inspect the carburetor and muffler. Refer to the manual for detailed troubleshooting steps and solutions to restore engine efficiency and reliability.

6.2 Addressing Transmission and Brake Issues

For transmission problems, check the fluid level and ensure the filter is clean. Inspect for any signs of contamination or wear. If the tractor doesn’t move smoothly, adjust the gear engagement or replace worn belts. Brake issues often involve adjusting the brake cables or replacing worn pads. Ensure proper alignment and functionality to maintain safety. Consult the manual for specific adjustment procedures or contact Sears support for professional assistance if problems persist.

6.3 Solving Mowing Deck and Blade Problems

Common mowing deck issues include uneven cutting, blade imbalance, or obstruction. Check blade balance by removing and weighing them. Sharpen or replace dull blades to ensure clean cuts. Clear debris from the deck regularly to prevent blockages. Lubricate pivot points for smooth operation. If vibration occurs, tighten loose bolts or replace worn parts. For persistent issues, refer to the manual or contact Sears Craftsman support for professional assistance.

Warranty and Support

Craftsman LT1500 offers a two-year warranty covering parts and repairs when properly maintained. Contact Sears Craftsman support at 1-800-659-5917 for assistance or warranty-related inquiries.

7.1 Warranty Coverage Details

The Craftsman LT1500 is backed by a two-year limited warranty, effective from the purchase date. This warranty covers defects in materials and workmanship for parts and components when the tractor is properly maintained, lubricated, and serviced as outlined in the owner’s manual. During this period, Sears will repair or replace defective parts free of charge. The warranty applies to the original purchaser and is non-transferable, ensuring protection for the specified duration under normal residential use.

7.2 Contacting Sears Craftsman Support

For assistance with your Craftsman LT1500, contact Sears Craftsman Support at 1-800-659-5917, available Monday through Saturday from 5 AM to 5 PM (PT). Representatives are ready to address questions, warranty inquiries, or repair needs. Additionally, visit the Sears Parts Direct website for online support, manuals, and parts ordering. This resource ensures you can troubleshoot or resolve issues efficiently, keeping your LT1500 in peak condition.

Additional Resources

Access the Craftsman LT1500 manual as a PDF download. Explore online parts, user guides, and specifications on Sears Parts Direct for comprehensive support.

8.1 Accessing the PDF Manual

The Craftsman LT1500 manual is readily available as a downloadable PDF. Visit Sears Parts Direct or official Craftsman websites to access the document. The PDF manual includes detailed instructions for operation, maintenance, and troubleshooting. Model-specific guides, such as the LT1500, ensure accurate information tailored to your equipment. Download the manual to explore sections on safety, warranty, and parts diagrams. This resource is essential for owners seeking to optimize their mower’s performance and address any issues efficiently. Ensure you have the latest version for the most accurate guidance.

8.2 Online Parts and Manuals

For convenient access, Sears Parts Direct offers a comprehensive collection of parts and manuals for the Craftsman LT1500. Users can easily search and download the PDF manual or browse through detailed part diagrams. This online resource ensures quick identification and purchase of replacement parts. Additionally, Sears provides free shipping on orders over $45, making maintenance and repairs hassle-free. Explore the online catalog to find everything needed to keep your LT1500 running smoothly and efficiently throughout the mowing season.